
IMAGE TRANSFER ON POLYMER CLAY
This article by @handxmade is free for personal use ONLY, any reproduction is prohibited.
If you’d like to show your appreciation for these articles through monetary means, you can send me a ko-fi! ☕️
Image transfer is something that I chanced upon on the glorious internet, and was kept at the back of my mind constantly until this order came through. The milk carton on the shirt that the female is wearing is made with image transfer, and because she has the exact same t-shirt, this made this figurine so much more meaningful imo!
If you don't trust your painting skills (like me hahahaha) especially for tiny details, image transfer could be your solution!
There are people who sells miniature books this way and it just looks so professional and legit because of all the details it captures (basically everything!), so it's definitely a good "skill" to have ☺
Even the background for Stranger Things Christmas Wall Lights uses image transfer too!

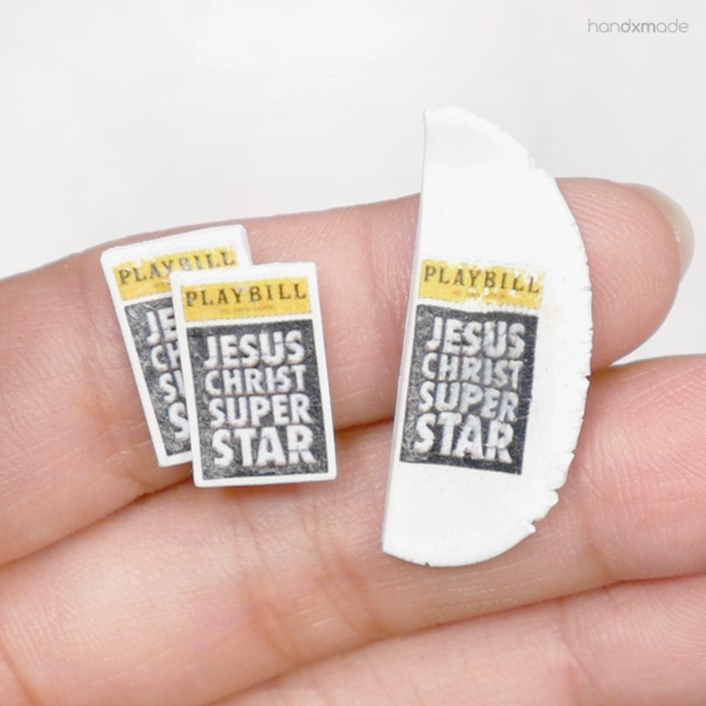
For the playbill in my Alison 2D Diorama, I was getting stressed when I thought I had to paint it. I mean, look at those details! Painting alphabets is really difficult ok HAHA and the fact that there's a different colour as a background, it'd be hard for me to "scape" off the paint if I painted it wrong (I do that sometimes haha).
Thank goodness I remembered about image transfer phew 😶
IMAGE TRANSFER ON RAW POLYMER CLAY

The most important thing about image transfer is that:
1. You NEED the picture to be printed with LASER JET printer, NOT inkjet!
The difference between inkjet and laser printers is that while inkjets use ink, laser printers use toner to produce an image. Toner is an electrically charged powder that is fused to paper fibers using heat during the printing process. So therefore, during image transfer, you're essentially transferring those electrically charged powders to the clay.
2. You can only do image transfer on RAW POLYMER CLAY. (UPDATE: Found a method to do image transfer on baked clay, scroll down!)
Raw polymer clay is a little bit sticky so that helps the image to adhere itself on the clay! 😊
3. The picture HAS TO BE FLIPPED.
The way you transfer the photo will be flipped, so to fix that "issue", just flip the original image before you print it! (Like the photo above). I'll show you how now 😊

First thing you need to do: find the image you want to use to be transferred on the clay!
Now, before you do this, there IS this thing call licensing, so if you're going to sell whatever you're making with this, do ensure that the photo is either 1. taken by you (a photograph), 2. artist allows public to use for personal AND commercial purpose (or sell, which to be honest is reallllly rare), 3. you bought the license for the image to do whatever you want with it.
For this image, I'm basically using it for a personal project and am not going to sell it!
What I usually do is I'd go on to microsoft word (you can use illustrator if you know how to, I don't, at least not yet 😆), drag the image in, make it smaller so it's more easier to control, then pull your arrow the other side to flip it!
I always press SHIFT whenever I adjust the size of photos! This makes sure the photo is being adjusted with fixed ratio (so one side doesn't get bigger than the other and the image will look stretched/squashed on one side).
Double click on the image, and at the top right corner you'll see "Height" and "Width". These are the adjustments to adjust the photo according to size!
I always measure the size I want it to be before I print it, so I save money ahahaha. (Can't you imagine printing and realising it's too small or too big and have to print again and again? *shivers*) Hence, this tool is very important to know you get the size you want!
Being a very skeptical person who don't trust myself, what I'd do is to copy and paste a lot of them so in case I messed up, I will always have extras!
Sometimes I even change the size by 0.1cm (trust me in miniature world it makes a whole lot of difference) and copy paste a bunch of them so I can have more choices after I print it too!
I don't have a laser printer at home, so I usually get my image transfers to be printed outside! Just make sure you ask for LASER JET before you print!!! Some printer shops uses inkjet too.
When you finally done all the editing and printing part, here's the part where you'll see the magic happens ✨
Place the photo that you want to transfer on raw clay, using normal tap water, place some on top of the paper, and wait for it to soak a little.
DO NOT put water on the clay before you put the paper! It will make the paper slide in and out and it'd make it impossible for you to do the next step!
Using your fingers, gently rub on the surface of the paper!
I usually start from the middle, but I don't work on one spot all the time. Move around and make sure you get the edges! Go from the middle to out because if you start from outside, you might rub off the whole paper WITH the ink.
Don't use too much strength either. You can press it down but rubbing it too hard might mess with the image! You just want to rub the paper off 😊
Here you can start to see the image coming out! Continue rubbing, and make sure that there's ample water, and clean the area up when you need to (you can see me do both here).
Almost there!! These gifs are in REAL TIME and yes, it takes awhile 😆
Usually when I'm at this stage...I'll be SUPER careful and I basically don't even touch the clay most of the time! Because the image might get rubbed off and get separated 😱
Here you can see my speed decreased quite significantly, and I'm only removing the big piece.
Usually I won't even remove some of the paper there because, again, part of the image might get rubbed off!
Here on the piece on the left, you can clearly see some paper on the piece. But everything straight and the image is still intact! (well...most)
The piece on the right however, at the right side, I actually rubbed a lot more and you can start to see the words warping, and the ink smudging together. Some of the image at the top also got removed and it's far more obvious than the piece on the left!
That's why, print a lot of it! Fill up the piece of A4 paper with images in case things like this happen hahaha.
Note that I didn't really rub very hard - I was just trying to get rid more of the paper! Well now you know you shouldn't try too hard 😟
There's a way to fix those ugly pieces of paper on the clay, thankfully!
Because it's basically an image on the surface, it's advisable for you to glaze it to protect it anyway, and good news is when it's wet, the paper essentially becomes kind of transparent! You can still see them sometimes especially when it's a bigger piece of paper AND it's sticking out, but most of the time it gets hidden well with a dab of gloss glaze!
For this playbill, since it's suppose to be paper, I used matte glaze on top of the gloss glaze and it still looks clear! Yaye!
Hope whatever I said made sense (hahaha) and this article helped you to figure out how to use image transfer on polymer clay! As usual, let me know if you have any questions! 😊
So recently I finished this huge project and took up a challenge that I've never done before - making miniature beauty products and shelves from scratch!
Thanks to this, and after TONS of trial and error, I figured out new image transfer methods so of course I gotta update this article weeee! ✨
IMAGE TRANSFER FOR BAKED CLAY/ON OTHER SURFACES
This was something that I thought about trying out but never did until this project, and I'm so glad that it works so well!
Before we go on I recommend watching this video to have a general idea which would be helpful!
This one's a little bit easy, and quite straight forward 😊Basically, from what you've read above, you'll know that the ink needs something to adhere to while you rub off the paper with water.
So based on that, I wanted to see if I could make the ink "stick" to another medium, so I decided to try it with my gloss varnish, which if you read that article, would be Diamond Flecto Gloss/Flecto Varathane (they're the same). I wanted to tell you exactly what I used just in case it doesn't work with other varnishes. You never know!
Remember to ALWAYS do it on a test piece first!
The gloss varnish works for me for this project as I needed it to be glossy anyway. Let's say if I needed to be matte, I'd probably put my matte varnish over the gloss varnish instead since my matte glaze is VERY diluted and possibly not sticky enough.
Basically you just put the gloss varnish on the surface you want it to be on..
...and place the image you want to transfer on!
I would probably glaze the whole area just so everything looks even, since putting a layer of glaze means that there WILL be a slight layer which can be quite obvious if it's not even spread.
Wait for the glaze to dry COMPLETELY, and then use water to rub the paper off as usual!
One good thing about this method is that the image does stick on the glaze quite well, so you don't have to worry about rubbing off the image/distorting it!
That means that I could really work on it to get rid of most if not all of the paper!
I realise that the imprint from the paper does get left on, so be sure to cut the paper as close as you can to the image!
I put another layer of gloss glaze after I tap it dry with a tissue, just to even it out a little bit more!
It's nice that you don't have to worry about distorting the image with this method, but it means that the image isn't embed on the clay/plastic, so it does "stick out" a little bit. If the project you're making can do with a little popping out this would work well 😊
IMAGE TRANSFER WITH RESIN GLUE
This method is really good if you need to use image transfer on SIX sides instead of just one!
Oh man this took me A WEEK to figure out (not exaggerating), and even after I did, not everything I make turned out okay 😅So prepare to do some trial and error on your own! I can help you reduce the amount of time spent on it but unfortunately I cannot promise you that you'll be able to do it on your first try.
As usual, please watch this video to get a better idea of how it works, and how I make the bottle pumps etc! I'm only going to show you the image transfer part ok 😀

First thing you need to do, is to of course make sure you have the images you need to transfer ready!
My client was very efficient and got all the products that I needed to make ready for me, but there was still a lot of editing for me to do to make it work.

BEFORE EDITING

AFTER EDITING
For example, since I only have a photo of the bottle on the left, I had to edit away the words on photoshop with the clone tool slowly to get a side that's empty, and then duplicate it to make sure that I have four sides in total (photo on right)
Fold the sides and use a ruler to flatten it. This ensures that there won't be crinkles from the folded sides, and makes it easier to make the shape when it's folded!

This is what you will get, and remember to have the top and bottom image too, which is basically the same as the sides for me.

Bake some polymer clay with white clay, and make sure the size will fit your images as close as possible!
This part is optional, but unless you want your image to be completely transparent looking, having a white background helps with showing the image better!
Sand the sides to make sure they're flat and the corners are sharp so that the image can stick on better and hence less room for mistakes!
Get your drill bits and screw one side, this will help you hold the baked clay better!

Now this is the most important part - the medium that the image will adhere to will be this Daiso resin glue!

Basically......the Daisos in Singapore ran out of Daiso resin glue for awhile, and I was like, no biggie, I can just grab any resin glue right? WRONG.
Here were some of the problems that occurred with all these resin glues that doesn't work:
1. Took too long to dry. Some of them recommended 48 hours and I'm just like I don't have the time to wait for it just to see if it works 😅
2. Some of the resin glue is COLOURED. You need transparent ones. Potentially less problem to deal with.
3. They just don't stick well enough...which is weird considering how they were all GLUES. The images basically gets removed with the paper!
This really made me speechless as some of these glue were up to $5-10 in the price range, and the $2 Daiso resin glue worked BETTER?? WHAT. IS. THIS. Granted, they probably weren't meant to be used for crafts with an impatient crafter to add, and maybe after 48 hours it will be ROCK HARD and sticks well, but yeah...I just ended up wasted a ton of money.
I even tried normal resin and nope, didn't work.
So for this method, don't waste your money and just get some Daiso resin glue! Unless it's out of stock, it should be relatively easy to get! (BUY A LOT OF THEM if you intend to do some trial and error yourself ok!! TRUST ME)
As usual, for resin glue, make sure you have Part A and Part B in an even amount and mix them up!
Get your resin glue on the baked polymer clay (just the sides, ignore the top and bottom for now), and make sure they are all evenly spread out, leave no gaps!
This is where having the drill bit makes it so much easier to do this, and not get it all over your fingers!
Do the same for the image you want to transfer too!
I find that this ensures that all the image gets the glue, hence less chance for it to go wrong. This really saved me a lot of failed pieces I feel! (Maybe it's just me hahaha)
Wrap the image around the baked clay, and make sure it "closes" nicely.
As you can see, my clay isn't PERFECTLY shaped to the size of the paper. I purposely made it smaller so that the paper will close properly, and also have a bit of the transparent effect.
The top and bottom will start to get overflowed with the resin glue, which then you just have to flatten it. I added more glue to make it as even as possible!
Place the images for top and bottom as shown. This part is a little tricky because if the glue isn't enough, the image transfer wouldn't stick at all. Yet if you put too much and it overflows, I think the resin glue will flow out and your image will ALSO not get transferred 😅
Trial and error, trial and error! You gotta try it yourself to see what works and have a better idea.
Also, prepared to have really sticky hands haha. Having wet paper towels/kitchen wipes will help a lot when you need to get those pesky glue on your fingers off!
By now it should be semi-dried, and you can use your tweezers to close any gaps properly and make sure nothing gets left out! This will only work if it's not too slippery like in the beginning, and yet not completely dry.
This is the reason why Daiso resin glue works so well too! I find that the amount of time it allows for making changes is perfect.
You'd also want to make sure you don't get too much resin glue on the paper on the outside, just in case it doesn't come out well after. I didn't really have much of a problem with this even though I did get some outside, but just don't glue the whole thing should do! As long as you have some space for the water to react with the paper 😊
After waiting for it to dry (about 1-2 hours just to be safe), trim off the excess paper with a pair of scissors!
Then you can proceed with removing the paper with water as usual!
Ohhh this is the scary part, not knowing whether it will stick well or not...
Sorry about the camera not focusing properly 😭
You can see a little bit of green being taken off here with the paper, but it wasn't a bit issue for me. However....imagine it taking A HUGE CHUNK OFF! 😱That's when I know I have to redo the whole thing 😅
But I still love this method because again, you don't have to be scared that the image will be distorted, since the resin glue dries rock hard! So I could actually SCRATCH the paper off :')
It works really well for this because the resin glue acts as a medium to adhere the images, and at the same time being a solid piece to BE the piece itself!
Here you can see me scratching more off haha. This was 95% perfect and trust me I was super happy to get this on camera HAHA. I think out of 10 I made, there will be at least 1-2 failed ones.
Here's the finished piece with most of the paper being removed! You can see how transparent it is, yet the image is still shown pretty nicely because of the white clay!
Especially since this image has white colour words, if there is no white background, the words would have been transparent and wouldn't be seen. I tried making one without the clay and it actually looks DARKER, albeit really transparent! So it really depends on what you need to make.
This resin glue method will probably also work if you want to make one side, like the previous two methods, BUT resin glue IS quite thick so the image will be "popping out" even more than if you use the glaze!
After it dries, usually you'll be able to see more spots that has paper that you missed, so feel free to re-water and remove more paper! I glazed it gloss again afterwards and that helps with "hiding" some of the paper too. 😊

I didn't take a photo of the white bottle so here's a little funny one HAHA.
If you happen to need an OPAQUE bottle like this one, just mix your resin glue with acrylic paint, and use it to fill up the paper! You don't even need polymer clay with this, just have to make sure it doesn't flow out 😊
Don't put too much acrylic paint because it MIGHT mess with the compound. I've had some test piece that made the end product kinda squishy (but it's already dried), and some rock hard as usual. So thought I'll let you know!
Hope this helps and gives you a better idea of how I used image transfer on more than one side, and putting them on baked clay/other surfaces!