
MAKE YOUR OWN COLOUR RECIPE & HAGRID'S BIRTHDAY CAKE TUTORIAL
This article by @handxmade is free for personal use ONLY, any reproduction is prohibited.
If you’d like to show your appreciation for these articles through monetary means, you can send me a ko-fi! ☕️
This post is gonna be a little different, because other than sharing how to make your own colour recipe for future use, I'll also be sharing some tips specifically for making the miniature Hagrid's birthday cake that he made for Harry Potter!
Before we get started on anything, I suggest watching the video above to see how the cake was made from the beginning. Even though it's a time-lapse, it will be very helpful and I will only emphasise on things that are not immediately obvious from this video, so this part is crucial!
HOW TO CREATE YOUR OWN COLOUR RECIPE
What's this colour recipe you talk about and why do you need it, I hear you ask.
Well let's say you want to make a certain stuff (in this case a cake) and you need a specific colour, what you need to do is to mix 2 or sometimes even 3 colours together to achieve the colour you need.
Let's say you didn't record down how much clay you used for each colour (or don't know how to), and OMG YOU RAN OUT OF THAT COLOUR AND NEED TO MAKE MORE. But the next batch of colours you mix will never be the same anymore.....there might be too much of colour 1, or colour 2, and you might take a lot more time to try to get that very same colour.
That's how a colour recipe will come in handy! You basically write down how much of each colour you need to mix that specific colour, and if you happen to need more of that same colour...you can refer to your own recipe and you'll get at least 99.9% similar to the first batch you mixed 😊
And if you're gonna have workshops....you hafta make sure all the colours are the same amiright??
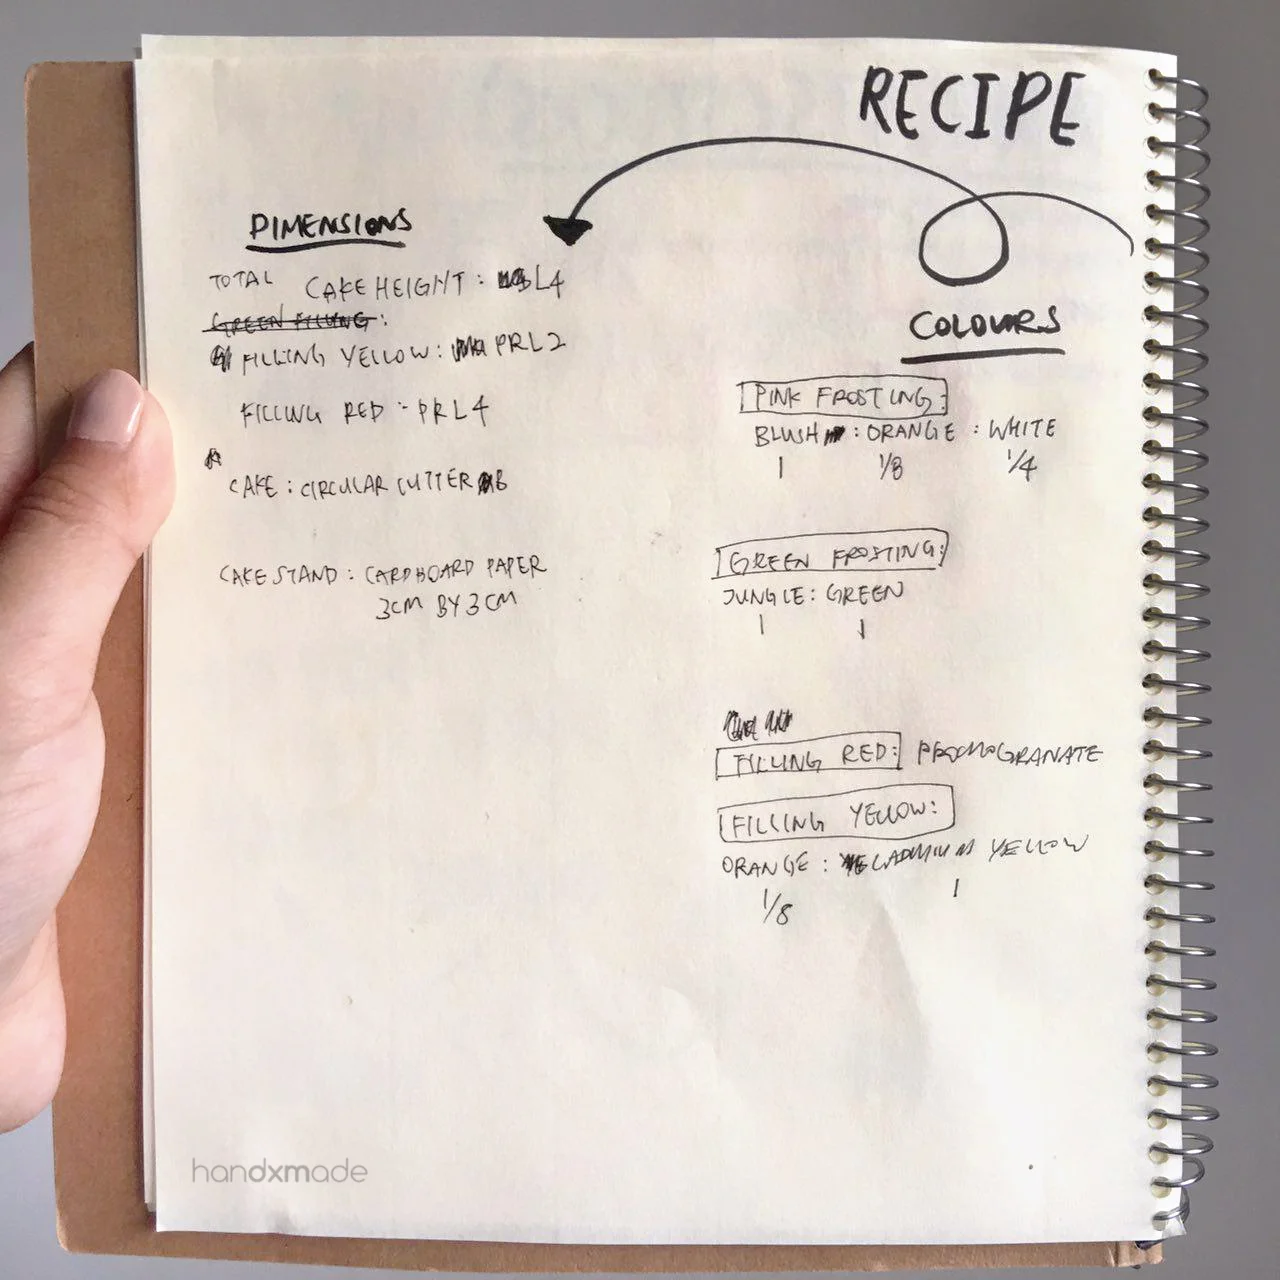
First thing you need to do: Get a notebook specifically for all your "recipes"! You don't want to write down on random pieces of paper and then lose them - figuring out the amount of colours to mix is not an easy job!
This notebook however is kinda like a book where I do my rough planning, so I do everything and plan it directly from here that's why it's quite a mess 😆 But you can always do it on a piece of paper and transfer the final recipe on your notebook 😊
This page specifically is for Harry Potter cake btw 😉
Now you may be wondering how in the world do you measure something like clay? I used to just pinch the colours I think I need, and just mix it. I never really thought about how I could measure it and just assume that it isn't possible, until I purchased @aiclay's Pocket Kitchen and learnt how to! So this is definitely a huge credit to Jocelyn for me.
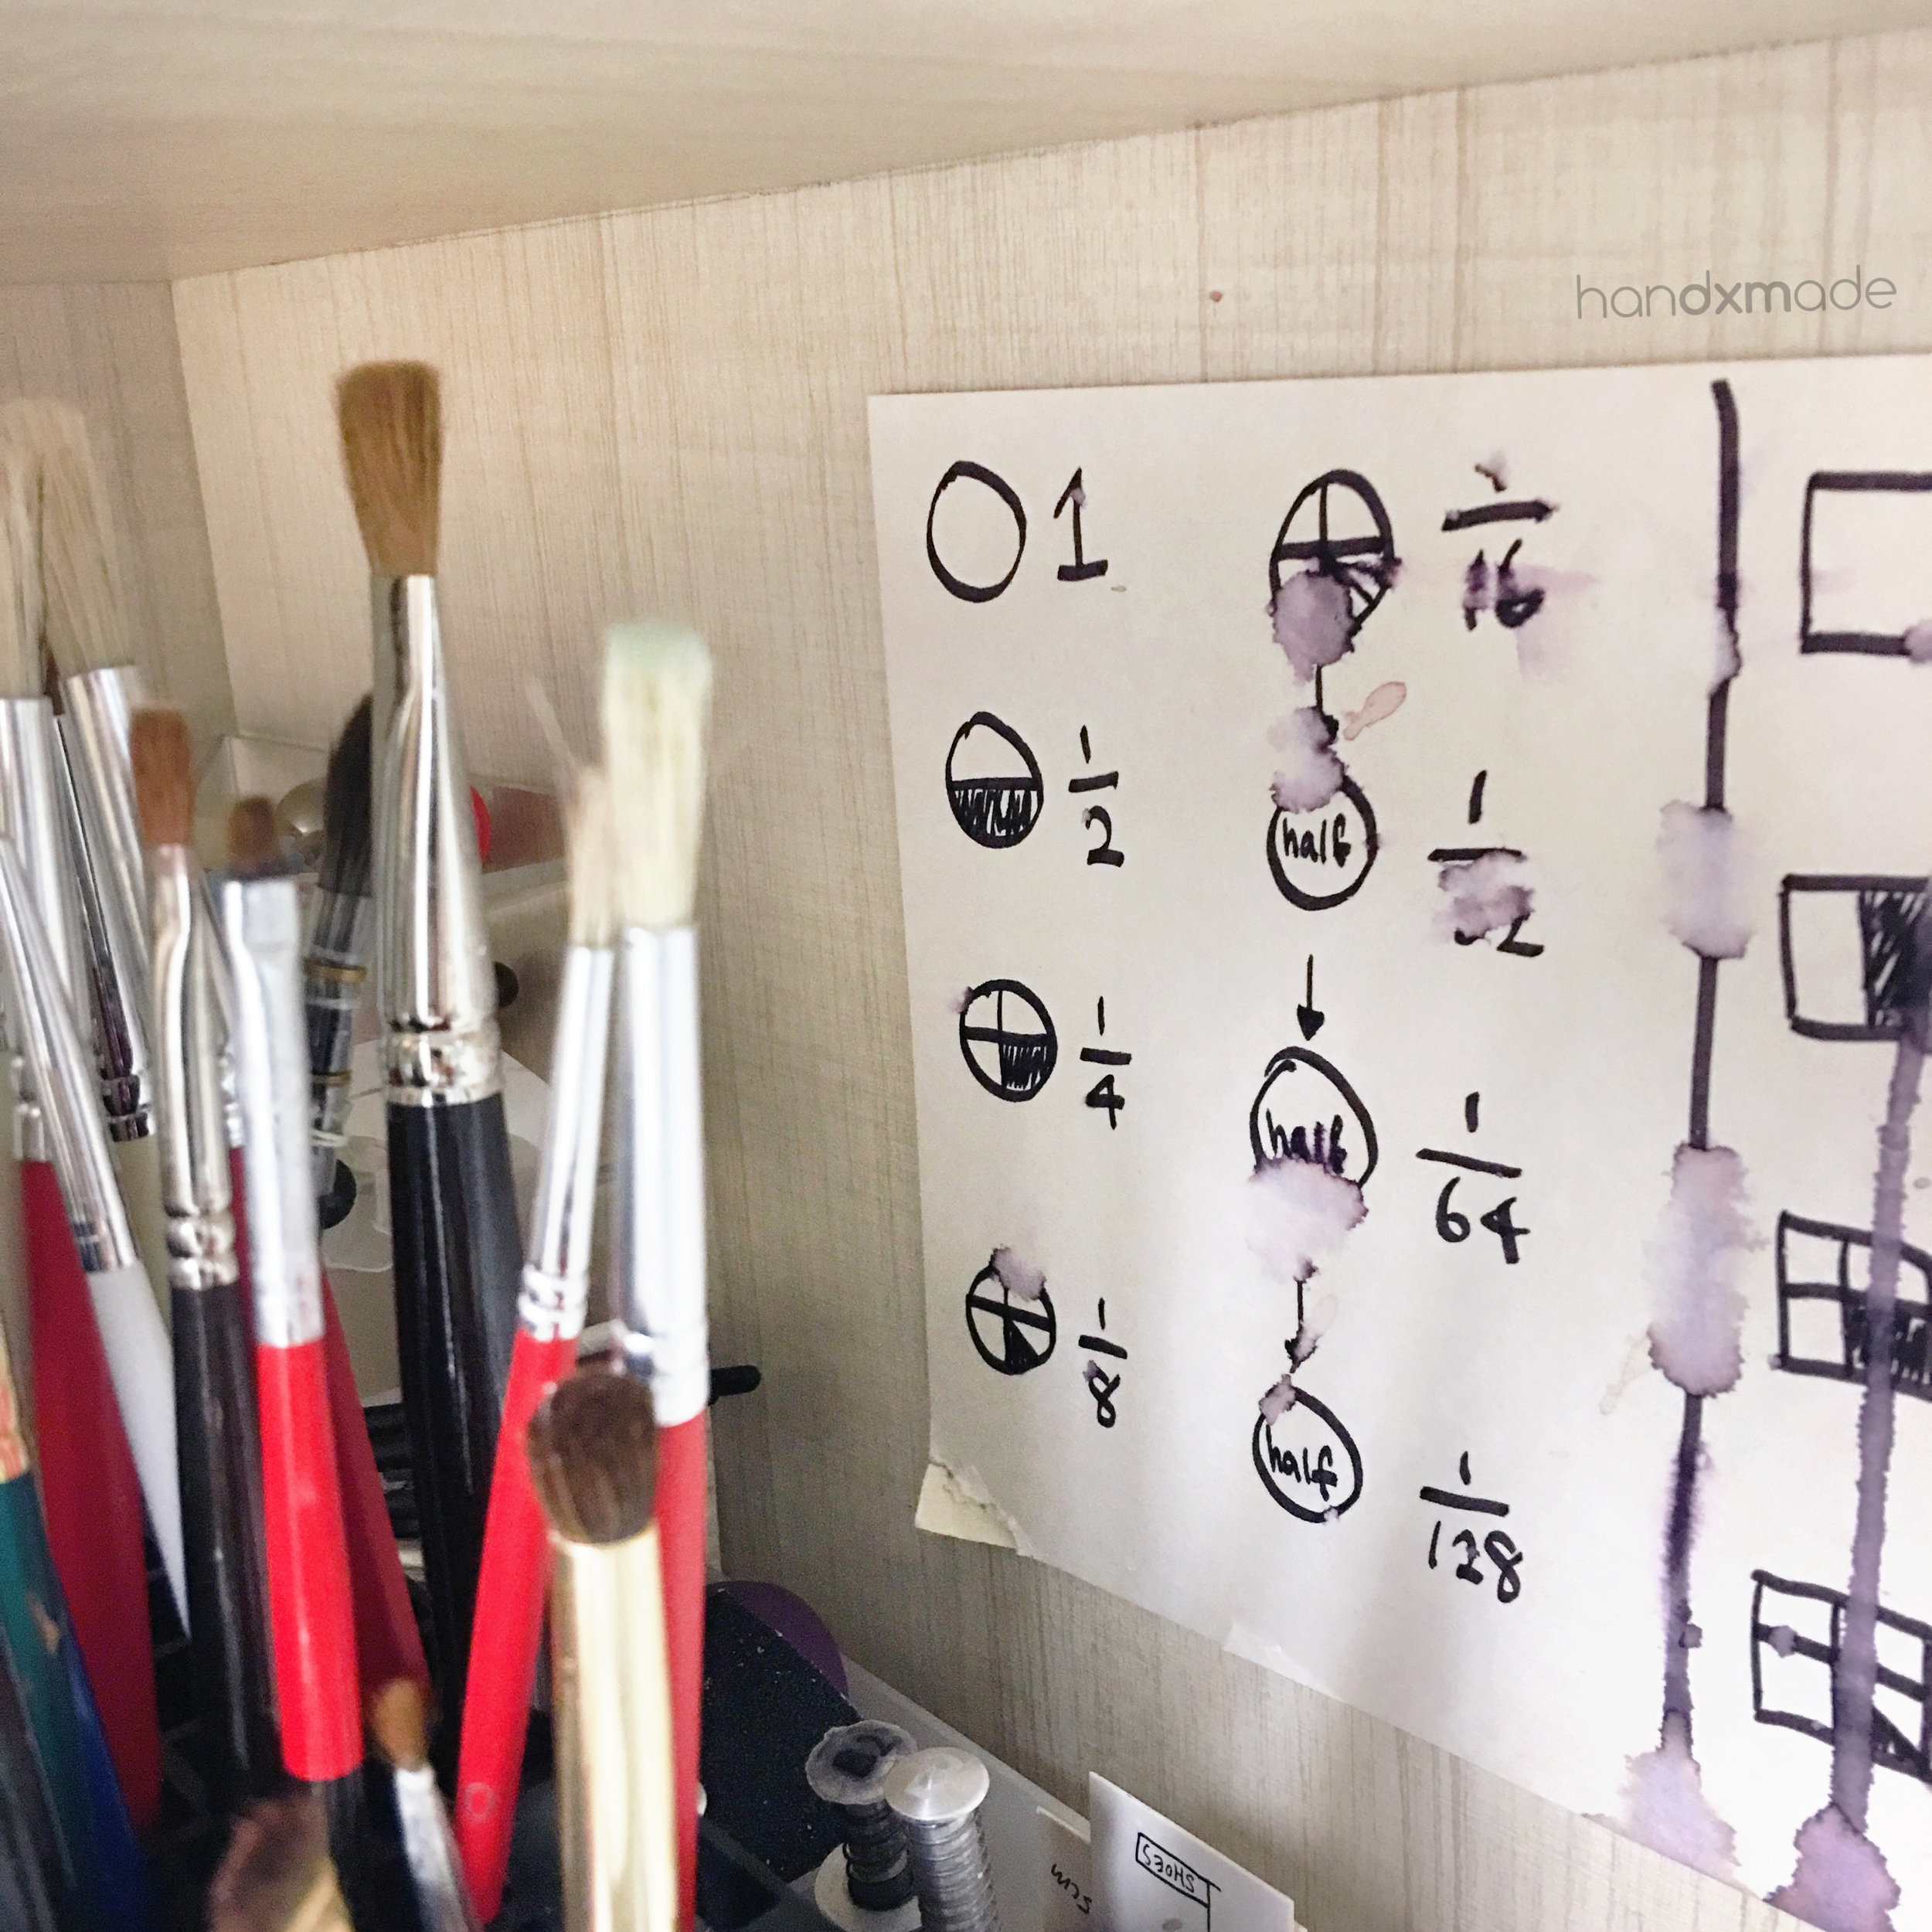
I was taught to measure clay by using the levellers to roll out the clay and stamp out a circle with circular cutters, and use THE FRACTION of each part of the circle I cut out to "measure" the amount of clay I used! HOW GENIUS IS THIS??? 😍
You can see a very well used chart (not sure how water got there LOL) I made because I cannot visualise and remember the fraction for the life of me 🙃

How I mix a colour and create a recipe:
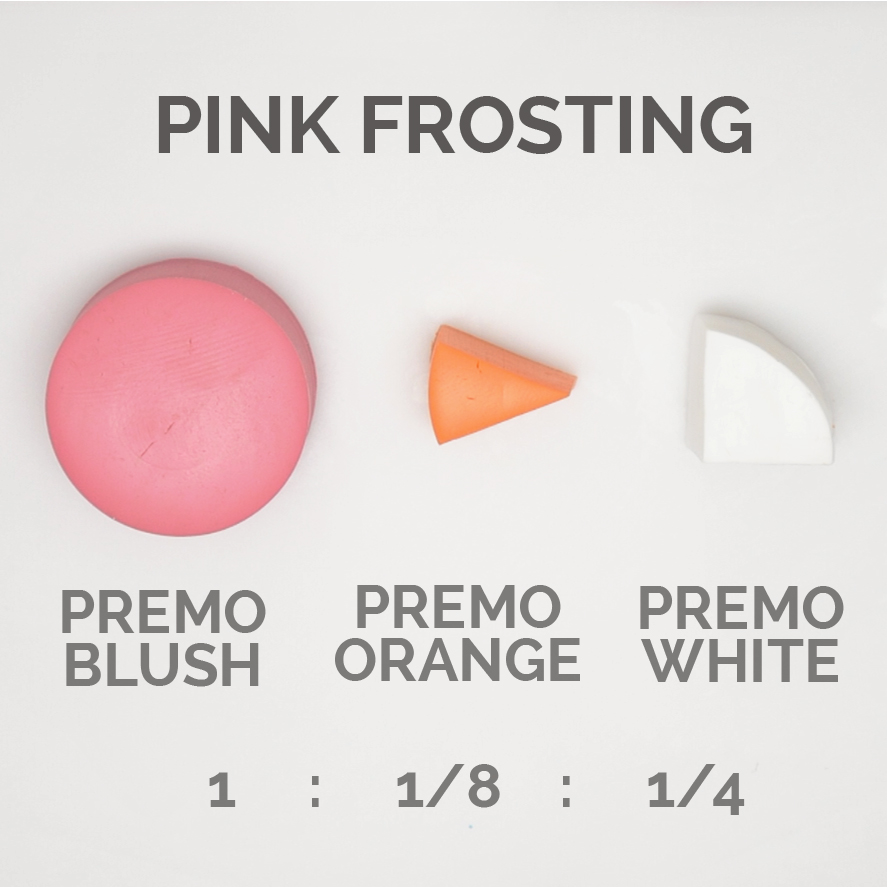
(I will be using the cake's pink frosting as example)
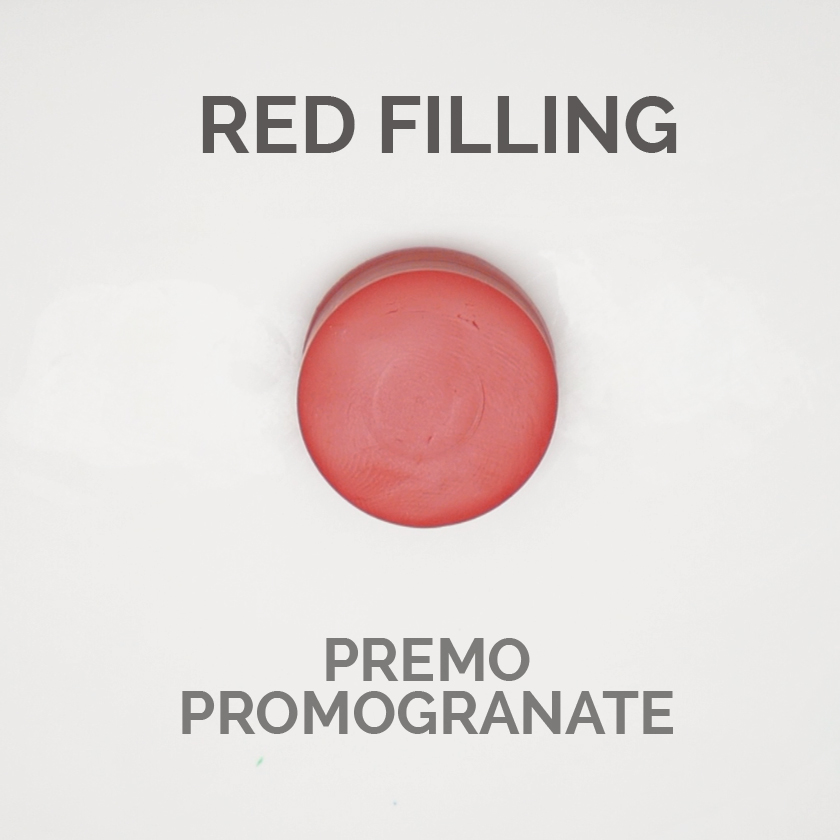
1. Make sure I find a reference photo with accurate colour (above). Sometimes photo filters will affect the original colour so do take note of that.
2. Take the colour that makes up the most of the colour, in this case, Premo Blush, and I use 1 whole of the circle since it takes up most of the colour - write it down.
3. Comparing Premo Blush with the reference photo, find out what is lacking, and what colour you'd need to "tint" it with. In this case, I felt that it needed some orange colour in it, so I added Premo Orange BIT BY BIT, starting from 1/32 - write it down.
4. It wasn't enough, so I added another 1/32 which made total 1/16 - on paper, cancel the previously written down 1/32 and change to 1/16.
5. It still wasn't enough, so another 1/16 was added, which made it 1/8 - edit on paper again.
6. This time, the colour seemed right, but it was too dark. So I added white, but once again starting from 1/32 to make sure I don't put too much and repeat the same steps until I get the colour as similar to the colour in the reference photo as close as possible. In this case, 1/4 white was the correct amount!
Once you practice and do lots of colour mixing, slowly you can kind of gauge how much you might need to put so you might not even have to start with 1/32 but 1/8 instead! 😊
I find this worked for me very well for all my colours that I mixed myself, and that less is always more! You don't want to start with too much colours right from the beginning and then realise that there's too much colour B....sorry, I don't know how to revert back as the ratio will get mixed up 😱 and it wouldn't be accurate again!! (Unless your math is really really very good then ehh ok go ahead 😶 I'd rather re-mix the whole thing if it happens to me 😆)
This method of mixing colours is also much better than just pinching colours especially if you're working with miniatures. I used to take too much clay and overestimated and I ended up with too much of the mixed colours - it's a huge waste of clay!
Also....colours to me are a very important part of a miniature. They are the first thing people notice, and it's a big part of visualisation. If you have correct colours but it's not as defined...I think you still can pull it off. If you know what I mean? 🙃 So hopefully this will will help to make your craft better!
HARRY POTTER CAKE TUTORIAL
To make things easier for you, here's all the colour recipe for Harry Potter's cake! You can try the method I talked about and give it a shot yourself first if you'd like. I do believe the more you try it the more you'll learn so don't be afraid to do it yourself first!
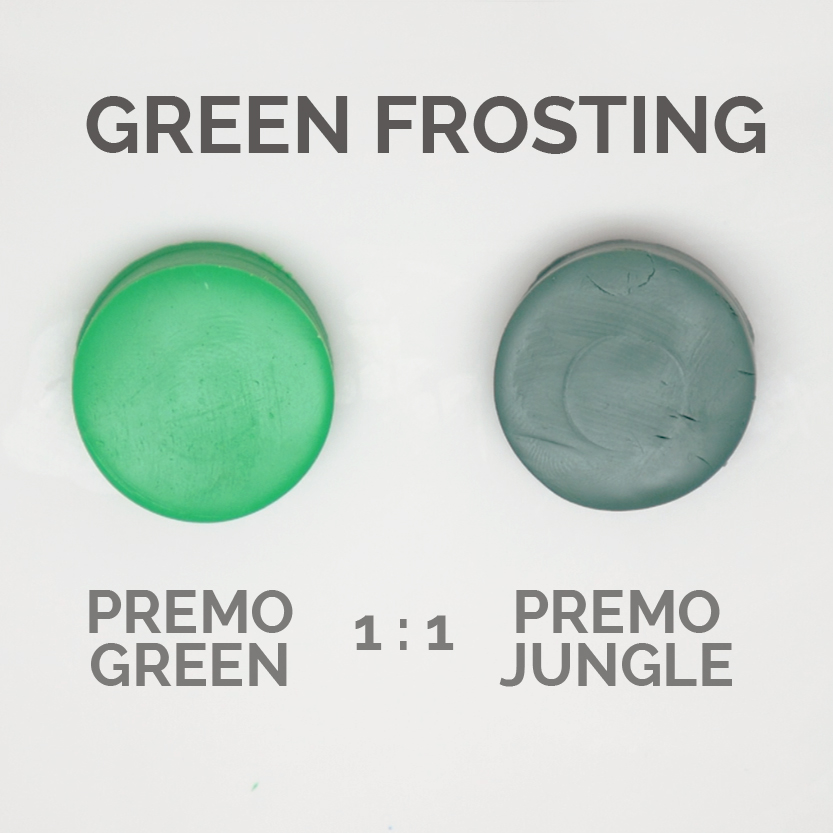
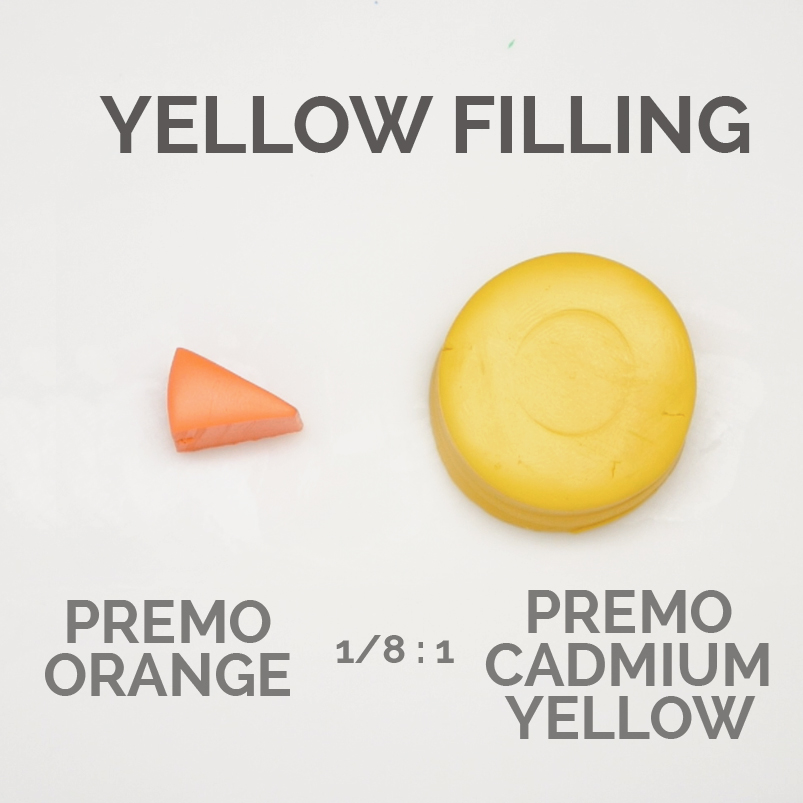
Because of how the recipe is, as long as you're using Premo clay with the same colours, the colours you mixed will be accurate to at least 99%! How awesome is that?? 😍
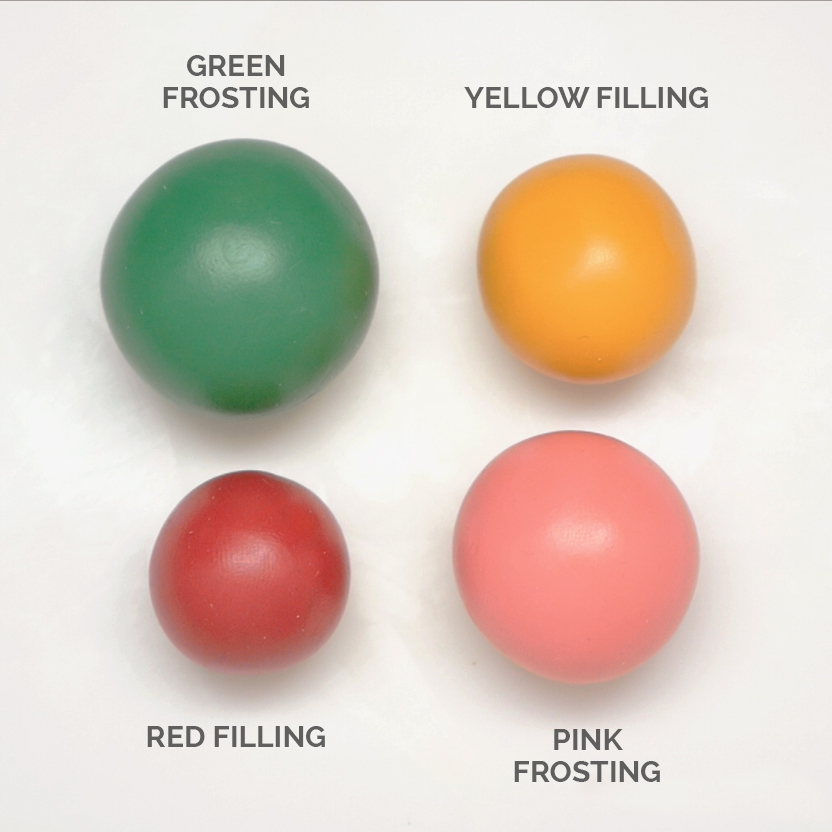
The colours after you finished mixing it 😊
Can you see how the two colours can be mixed in completely and change it to a completely different colour? 😀 I'm always very fascinated by that 😍

Mix liquid clay with the pink and green frosting colours you mixed, remember to put the liquid clay half or less than half of the amount of polymer clay! (An estimation will do)
If you need a reminder of how to do it, check my article about liquid clay!
I store them in containers like this and they will be usable for a very long time 😊
If you're making a huge amount of liquid clay like me, I realised that using the end of a rolling pin helps to mix the clays together SO MUCH BETTER 😆
But this is only for the initial mixing, and you'd still have to take bit by bit and mix with the blade from the curved probe tool to make sure there's no bits and pieces before you store them 😊

Remember to do the same for green frosting! I watched shows while I made them hahaha it's quite a long winded and mundane procedure 🙃
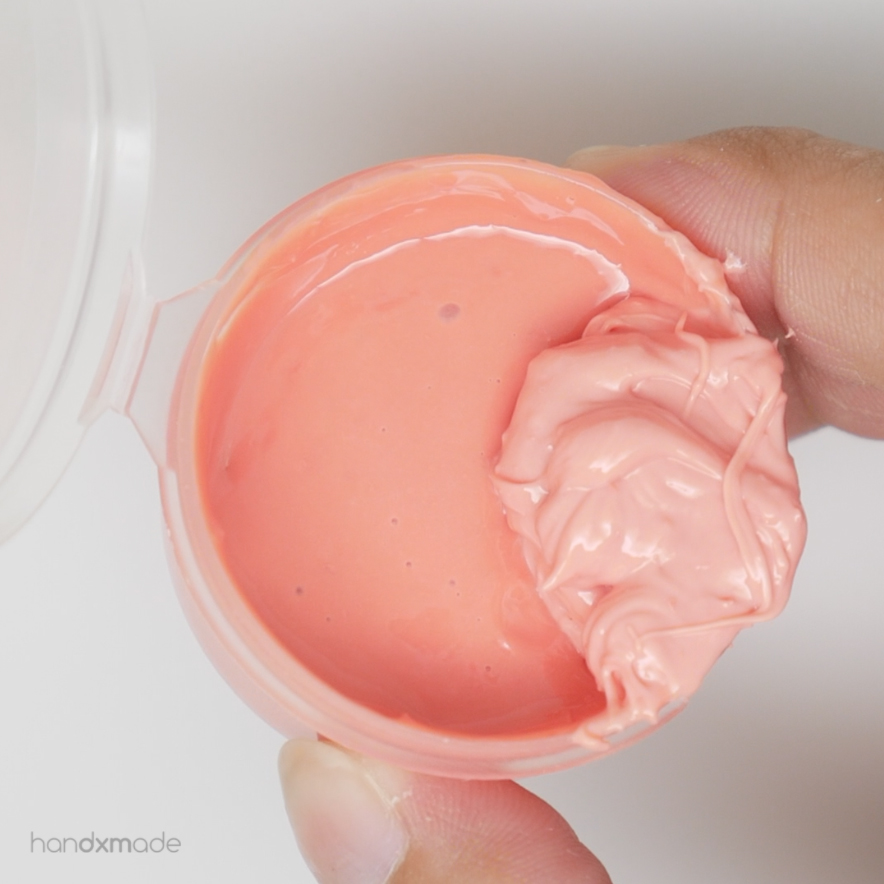
In my liquid clay article, I mentioned how Sculpey liquid clay feels different from FIMO liquid clay, and you can see the stark difference here! See how the fimo liquid clay (in container) totally settles down like water, whereas the one mixed with sculpey liquid clay doesn't settle down as well!
In this case, it's actually a huge advantage to know the difference because the cake that we're making....we NEED it to not settle down completely! We need that look as if the cake was frosted very badly hahaha. In my own pink frosting, there's about half of them mixed with fimo, another half with sculpey. I find that to be quite a good texture for Hagrid's cake.

I used the Pocket Roller from @aiclay's pocket kitchen, Leveller 4 for Red filling, and Pocket Roller Leveller 2 for yellow filling.
I also use circular cutter B from Pocket Kitchen!
Told ya I use her Pocket Roller ALL THE TIME. You need to get her Pocket Kitchen if you haven't man it's the best thing invented ever!! Even the Pocket Roller itself made the whole kit worth it.
If you don't have the pocket roller though, you can stack different thickness of paper and try to get the thickness as similar as possible 😊 (I think it's 0.5mm difference for each levellers? So Red filling is 2x the height of Yellow filling)
If you don't have her circular cutter, the diameter of the circular cutter I used is 2cm 👍🏻
BTW this is only necessary for the cake slices 😉 For the full cakes, the frosting covers it anyway so I actually used scrap clay for those 😝
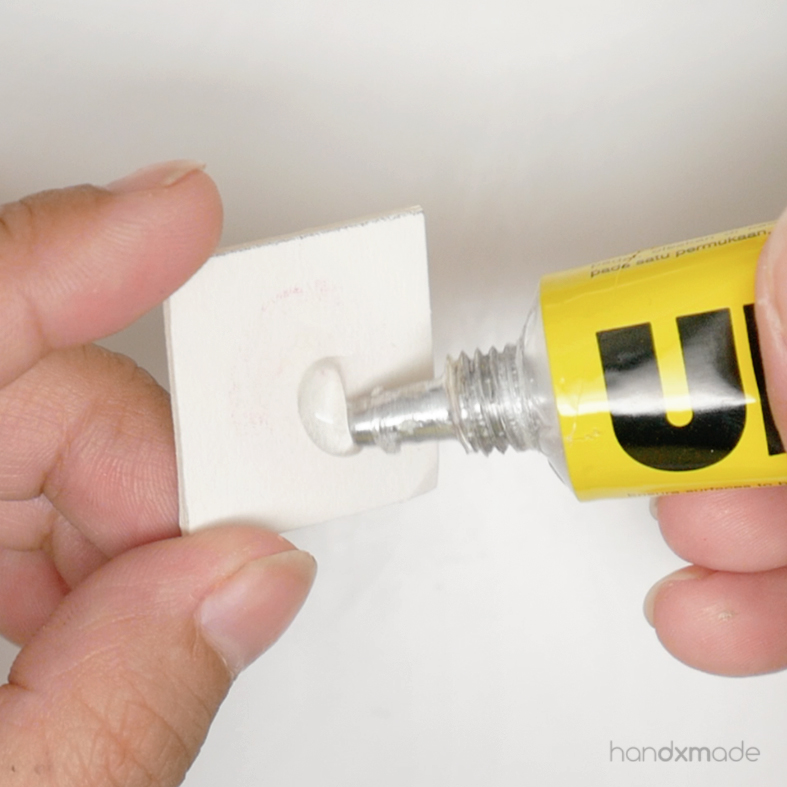
To make sure the cake sticks on the paper board I cut out (which is 3cm by 3cm), I used UHU glue! Liquid clay especially if there's a lot will make the cake move even more 🙃
Don't worry you still can bake it with UHU glue on!
For the FULL CAKE:
If you're making it into a charm, put the screw head in now.
Spread the pink frosting on the cake THINLY, and bake it in the oven! Then spread it another time. If you have sharp eyes, you'll see that the frosting at the bottom is matte = it was baked! 😉
You want to do this because you'll be making the cracks by drawing on the cake yourself, and if you do it without that first layer of pink frosting, when you "draw" on it you'll see the colour of the filling (which would be Red or whatever colour of the scrap clay you use 🙃)
Bake it again!

For ease of putting the frosting, I put them in this tiny zip lock bag!
Now I'm glad I found out about it while on my journey of finding out which container is good for storing liquid clay and using it as some kind of "pipping bag" 😝 This does so well as a disposable one 😆
Now, this is only to put the green frosting on the cake, albeit messily 😅 - I actually suck at writing with frosting 😂 But because the pink frosting is baked, I can adjust with my curved needle tool to make it at least legable 😂
Tip: wipe the liquid clay off the needle tool ALL THE TIME (with tissue, or blutack) before you try to remove any excess liquid clay from the cake! It actually cleans it off well and sticks on the needle tool, but if you have any liquid clay on it, it sticks back on the cake HAHA. Might be quite confusing now but you will understand when you try it out!
For the SLICES OF CAKE:
Cut the 3 layer of fillings with your blade like how you would cut cakes. I cut them into 1/8 size 😊
If you're making it into a charm, put the screw head in now.
Put the pink frosting at the top and side, and texture the sides of the cake with your needle tool!
For the texture, you don't want to just poke holes, you'll get just that - holes! To make it more realistic, think of it as if you're "scratching" the surface of the clay in tiny circles. If it gets too messy, THEN you can poke some holes to have some dimension in the texture!
And if you're making it into a decoration piece, place some frosting on the board, pick out some crumbs from the cake you textured (there will be a few which will dropped out by itself), and place it on the frosting on the board! 😊
Because who eats cake without crumbs falling all over? 😉
Alright so that's all I have for how you can make your own colour recipe, and the Hagrid's birthday cake itself! I hope this way of explaining and giving tips is helpful, and if it is, I might even do more of it in the future? Let me know! ❤