
GLOW DUST REVIEW AND TESTS ON POLYMER CLAY • SOLAR COLOR DUST
This article by @handxmade is free for personal use ONLY, any reproduction is prohibited.
If you’d like to show your appreciation for these articles through monetary means, you can send me a ko-fi! ☕️
On 18 December 2018, I reached one of the big milestone goals I have on Patreon:

It was a goal I didn’t really expect to reach that quickly, and was a pleasant surprise cause that means I get to explore glow-in-the-dark pigments weeeee! I’ve been aiming to get them from @solarcolordust after seeing lots of polymer clay artists using their pigments. It took me a few months to finally get the powders from them, and then another few months to finally find time to write this post! ✨
I even tried using them on one of my biggest project, Tsuki Treehouse, but as usual me being me, I wanted to do some intense testing and this post is all the results and conclusion after using the glow dust with polymer clay. 😌

❗️NOTE: This post is NOT sponsored by Solar Color Dust. I purchased everything in this article with my own money, and the opinion is mine and mine alone. This article has NO affiliated links and is FREE, but if you would like to show your appreciation, or if this article helped you out in making a decision to get certain glow dusts etc, you can always buy me a ko-fi, or check out my Patreon! I make miniature edutainment videos, so if that’s your thing, feel free to become a patron and be part of da fam! 💖
This article is only possible because of my patrons, so a huge huge thank you to each and every single one of them to help me have the financial freedom to create articles like this 😭💕(If you would like to be one of them, you know where to go!)
WIFI is recommended as this article is filled with tons of GIFs which might require a lot of data. All GIFs are in real time unless otherwise stated.
This article by @handxmade is free for personal use ONLY and any reproduction is prohibited.
If you’d like to show your appreciation for the freebies through monetary means, you can send me a ko-fi or head to my Patreon and consider being a patron! 🥰

What came in the package!
I bought two sets of sample pack - which I thought was quite ingenious of them to provide! You can choose 10 different type of colour dust, and each sample pack is 5g. I thought it would be able to last me quite awhile since I deal with miniatures, and it would be nice to be able to make a chart with them so I could see what I would probably use more of in the future.
Basically, I got one of each colour, and filled up the few extra slots with colours that I thought I would enjoy using more of. Total cost came up to about USD $65 which includes:
1. USD $20 glow dust sample pack x2
2. USD $20 1g Mirror Mirror Chrome Dust (Not in this article)
3. USD $5 local US shipping
After using another shipping service to ship to Singapore. All in all, I spent about SGD $100 for this (seriously, wouldn’t be able to splurge on this without my patrons ok ily all 😭)
There’s a red packet that I think they gave as a extra/thank you package which is quite nice of them imo hehe (any extra is always welcome amiright)
They also provided a brochure of all the dusts/pigments they have, with a small description attached to them!

These Glow Dust will be what we’ll be focusing on here! ✨

Here is what’s inside the red extra packet: Some spoons, a pack of extra glitter (how generous! 😱), a sticker from the glitter brand, and their namecard. Unfortunately the glitter wasn’t sealed properly so as you can see it made quite a mess hahahaha.
I stored them in these circular container I have a bunch of, and used blutack to pick up the extra glitter that just seems to stick on everywhere - except where you want them to be at haha!
Blutack is your friend when it comes to messes like this - but only when you’re like “I-DON’T-WANT-TO-USE-IT-ANYMORE-I-JUST-WANT-MY-WORKING-AREA-CLEAN” of course, since you’d essentially be throwing them away 😬

Put them in my $2 daiso storage container with all the other glitters I have that I rarely use 😬
STORAGE
Now to the main event - here’s how the packaging looks like for the sample packs! I’m honestly not a huge fan of how it’s stored, especially when some of them doesn’t even have a proper ziplock closure (not sure why only some has it 🤔)

A group shot cause I just can’t help myself (I did spend $100 on them 🙃). There’s 14 different colours altogether! ✨
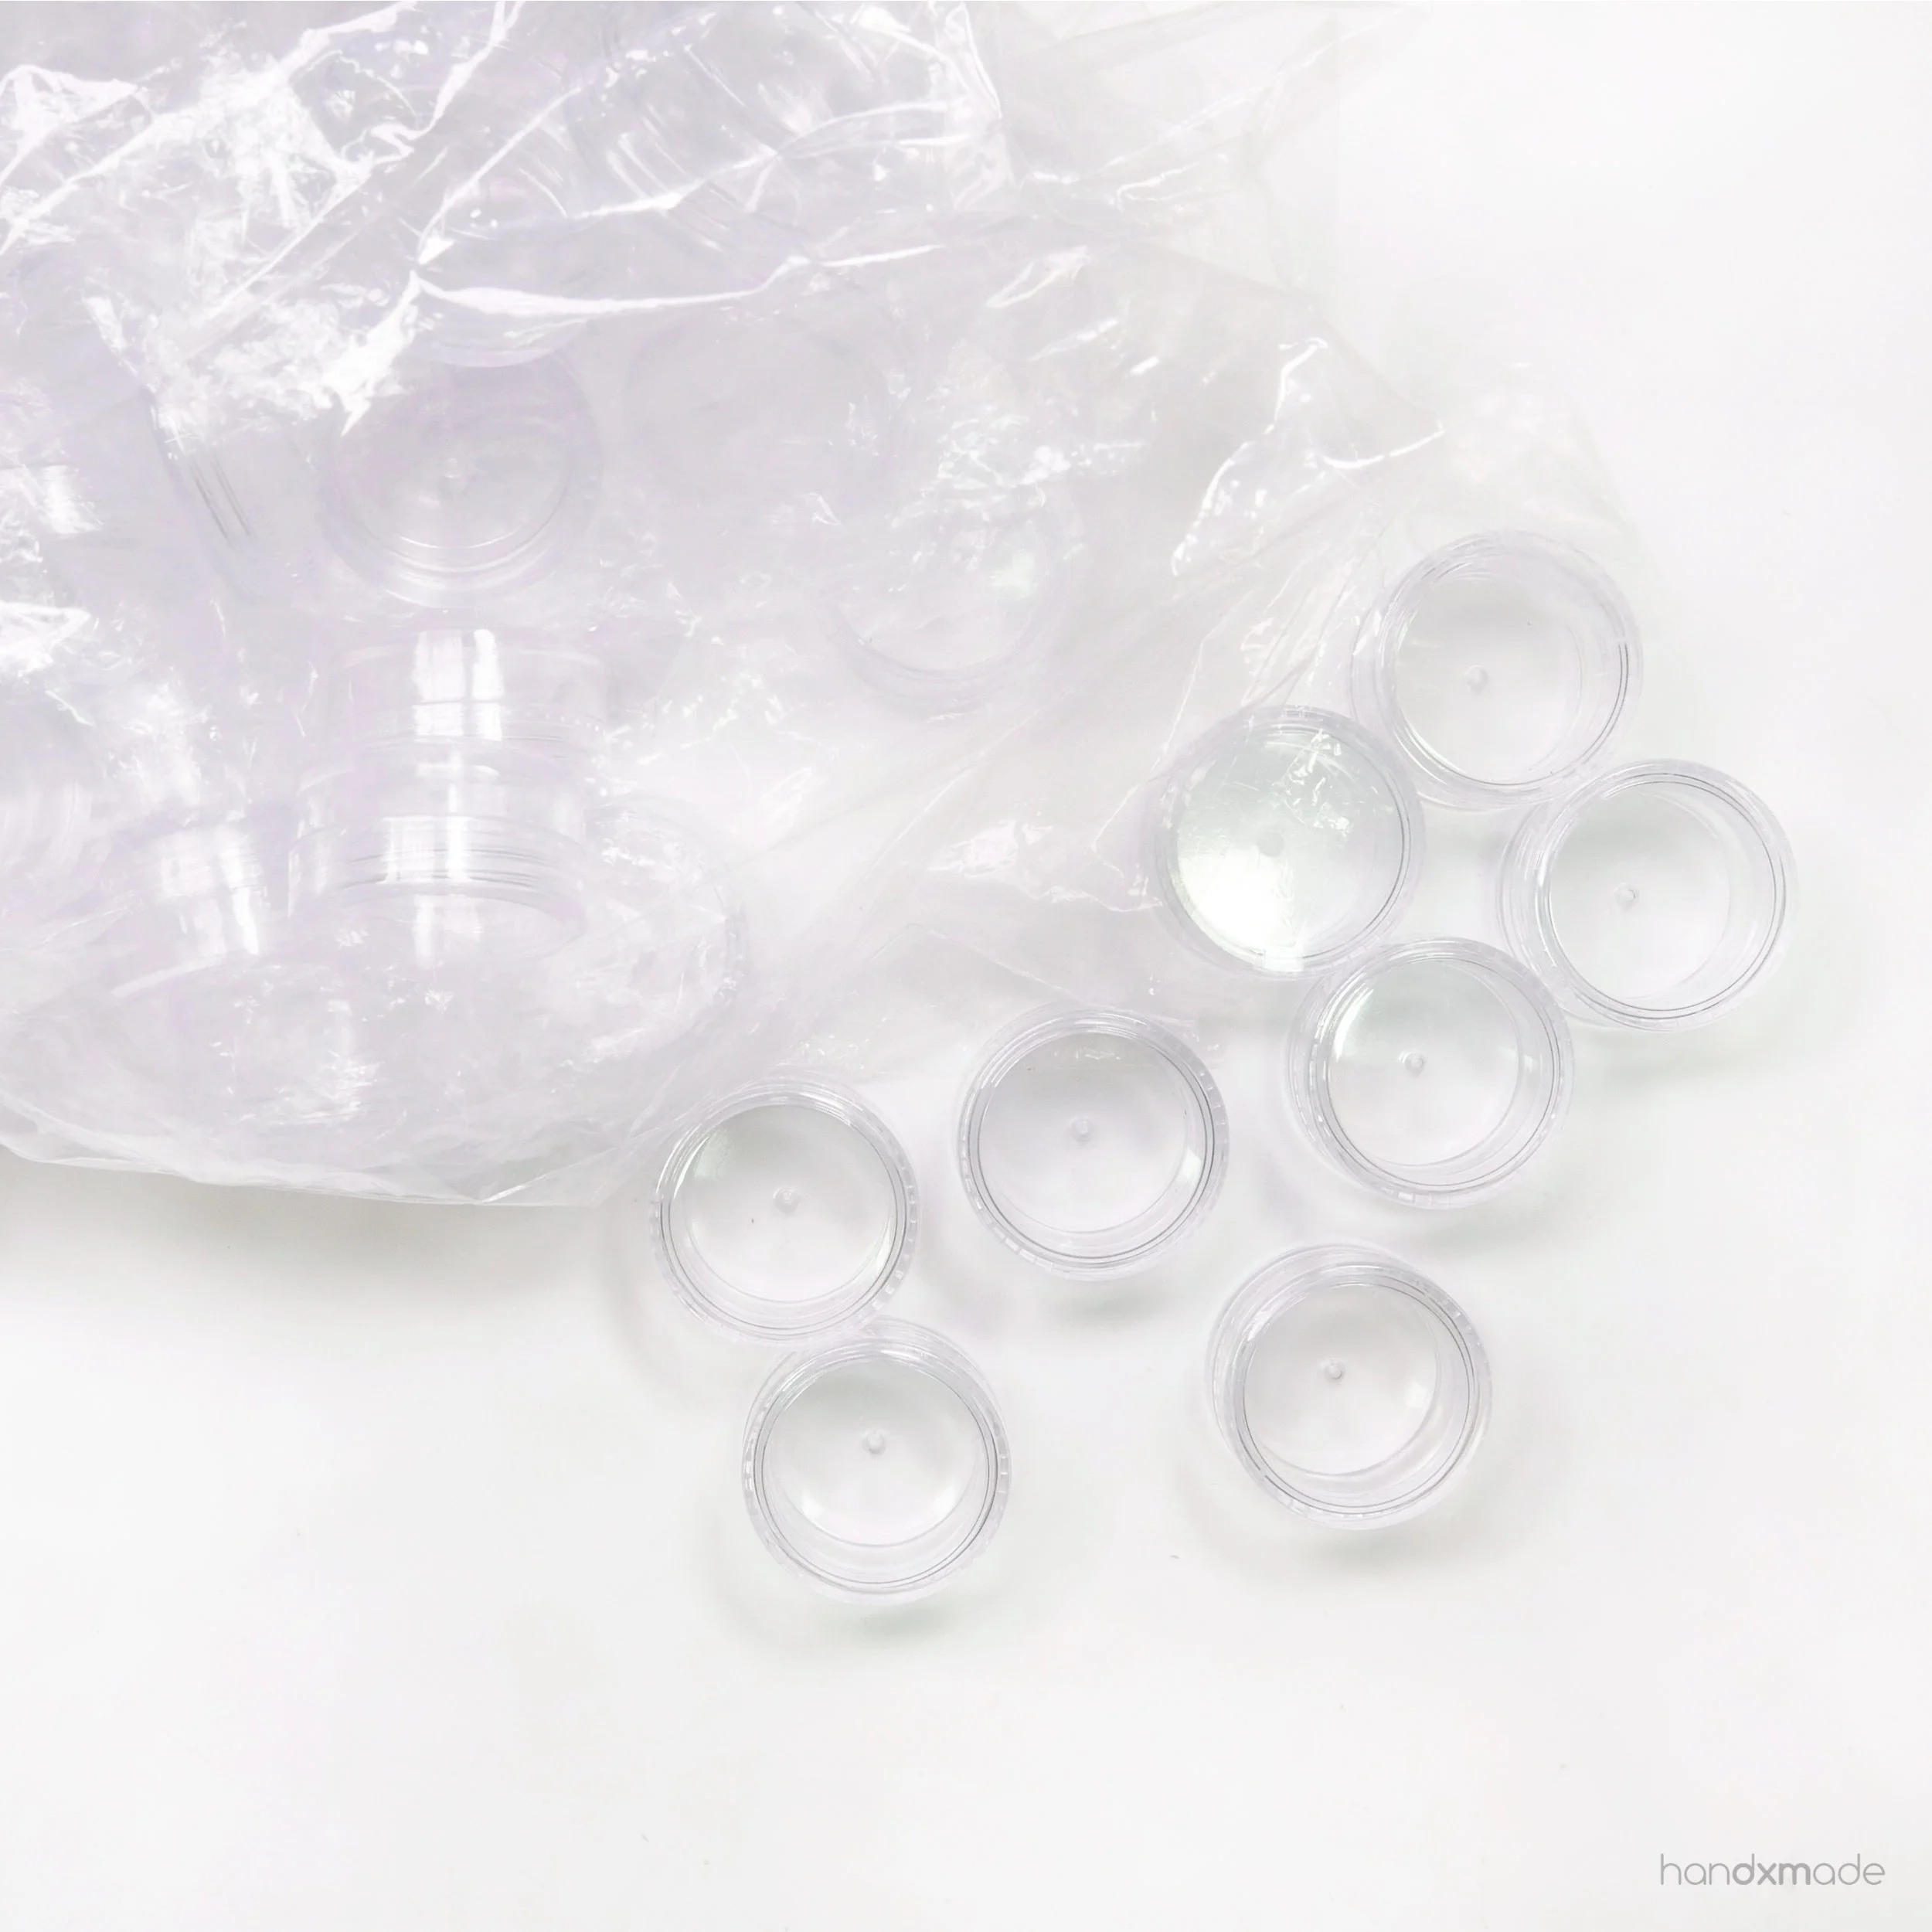
I got ready a long time ago, and purchased these little containers here. It was pretty affordable, approx $8 for 50 pieces! Not sure if I planned for it, but it’s for 5g which is the exact size the sample packs came in haahhahahaa.
I was surprised when one packet fits perfectly! Wew. I don’t think I planned for it at all lmao knowing me hahahaha super lucky!
Here I’m frantically shaking and testing if the powder would come out - IT DOESN’T! Yayeeeeeeee. Doing this as the containers for my glitters that were provided wasn’t that great so I was hoping these wouldn’t be the same. So glad it’s a lot better!
I recommend pouring them with a piece of paper underneath though so you can do this HAHA. Less wastage = save more money! Remember to wipe the paper with blutack after each pour to minimise contamination from the other colours!


Here’s what they look like in yet another $2 Daiso storage container. I’ve included a photo with them doing their thing - shining O-SO-BRIGHTLY ✨✨✨ (Last photo is a GIF, so you can watch them glow without lifting a finger to press anything ✌🏻)
Note how the colours are different when it’s glowing! Specifically the Invisible series. For example, “Invisible Green” has no colour in the powder but turns green after UV light shines on it in a dark environment.
TEST THOUGHT PROCESS
Here comes the excessive testing.

All photos are taken in the same settings and edited the same way (unless otherwise stated), and the glow-in-the-dark pigments are all shined with this UV light for 1 minute, with a portable charger suppling the light with power, and photo taken within approximately 3 seconds after the light is removed.
I will be using an ear pick spoon to make sure the amount of powder I take is approximately the same amount throughout this whole test. I can’t exactly say how many grams it is exactly, but hope this gives you a better idea. (The ear pick spoon is NEW and clean ok hahaha I initially bought some to try to use it as a tool for polymer clay sculpting but didn’t really worked out, but hey look how useful it is to be used for picking up tiny amount of powders hurhur)
The amount of clay is also about the same: A circle cut with circular cutter C (if you have AiClay’s Pocket Kitchen), with a 0.2cm thickness.
The first test - using the powder directly on raw clay. This usually would work for pigment like PearlEX so I thought I would give it a try, but it didn’t work for these glow dusts. Probably why they call it powder instead of pigments too - they just don’t stick that well (despite raw polymer clay being slightly sticky).


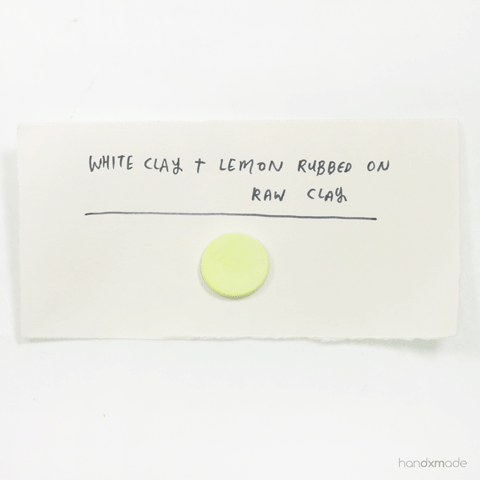
Here’s the result! As you can see, even though the powder’s original colour (Lemon) is pretty obvious on this test, the effect is pretty inconsistent, especially on the parts where there were some crevices and some powders were accumulated a little bit more there.
I also wouldn’t recommend this as other than the inconsistency of the glow, you’d also need to varnish it as it’s just a layer on top of the raw clay. If this effect is what you’re looking for, remember to varnish it after you bake it!
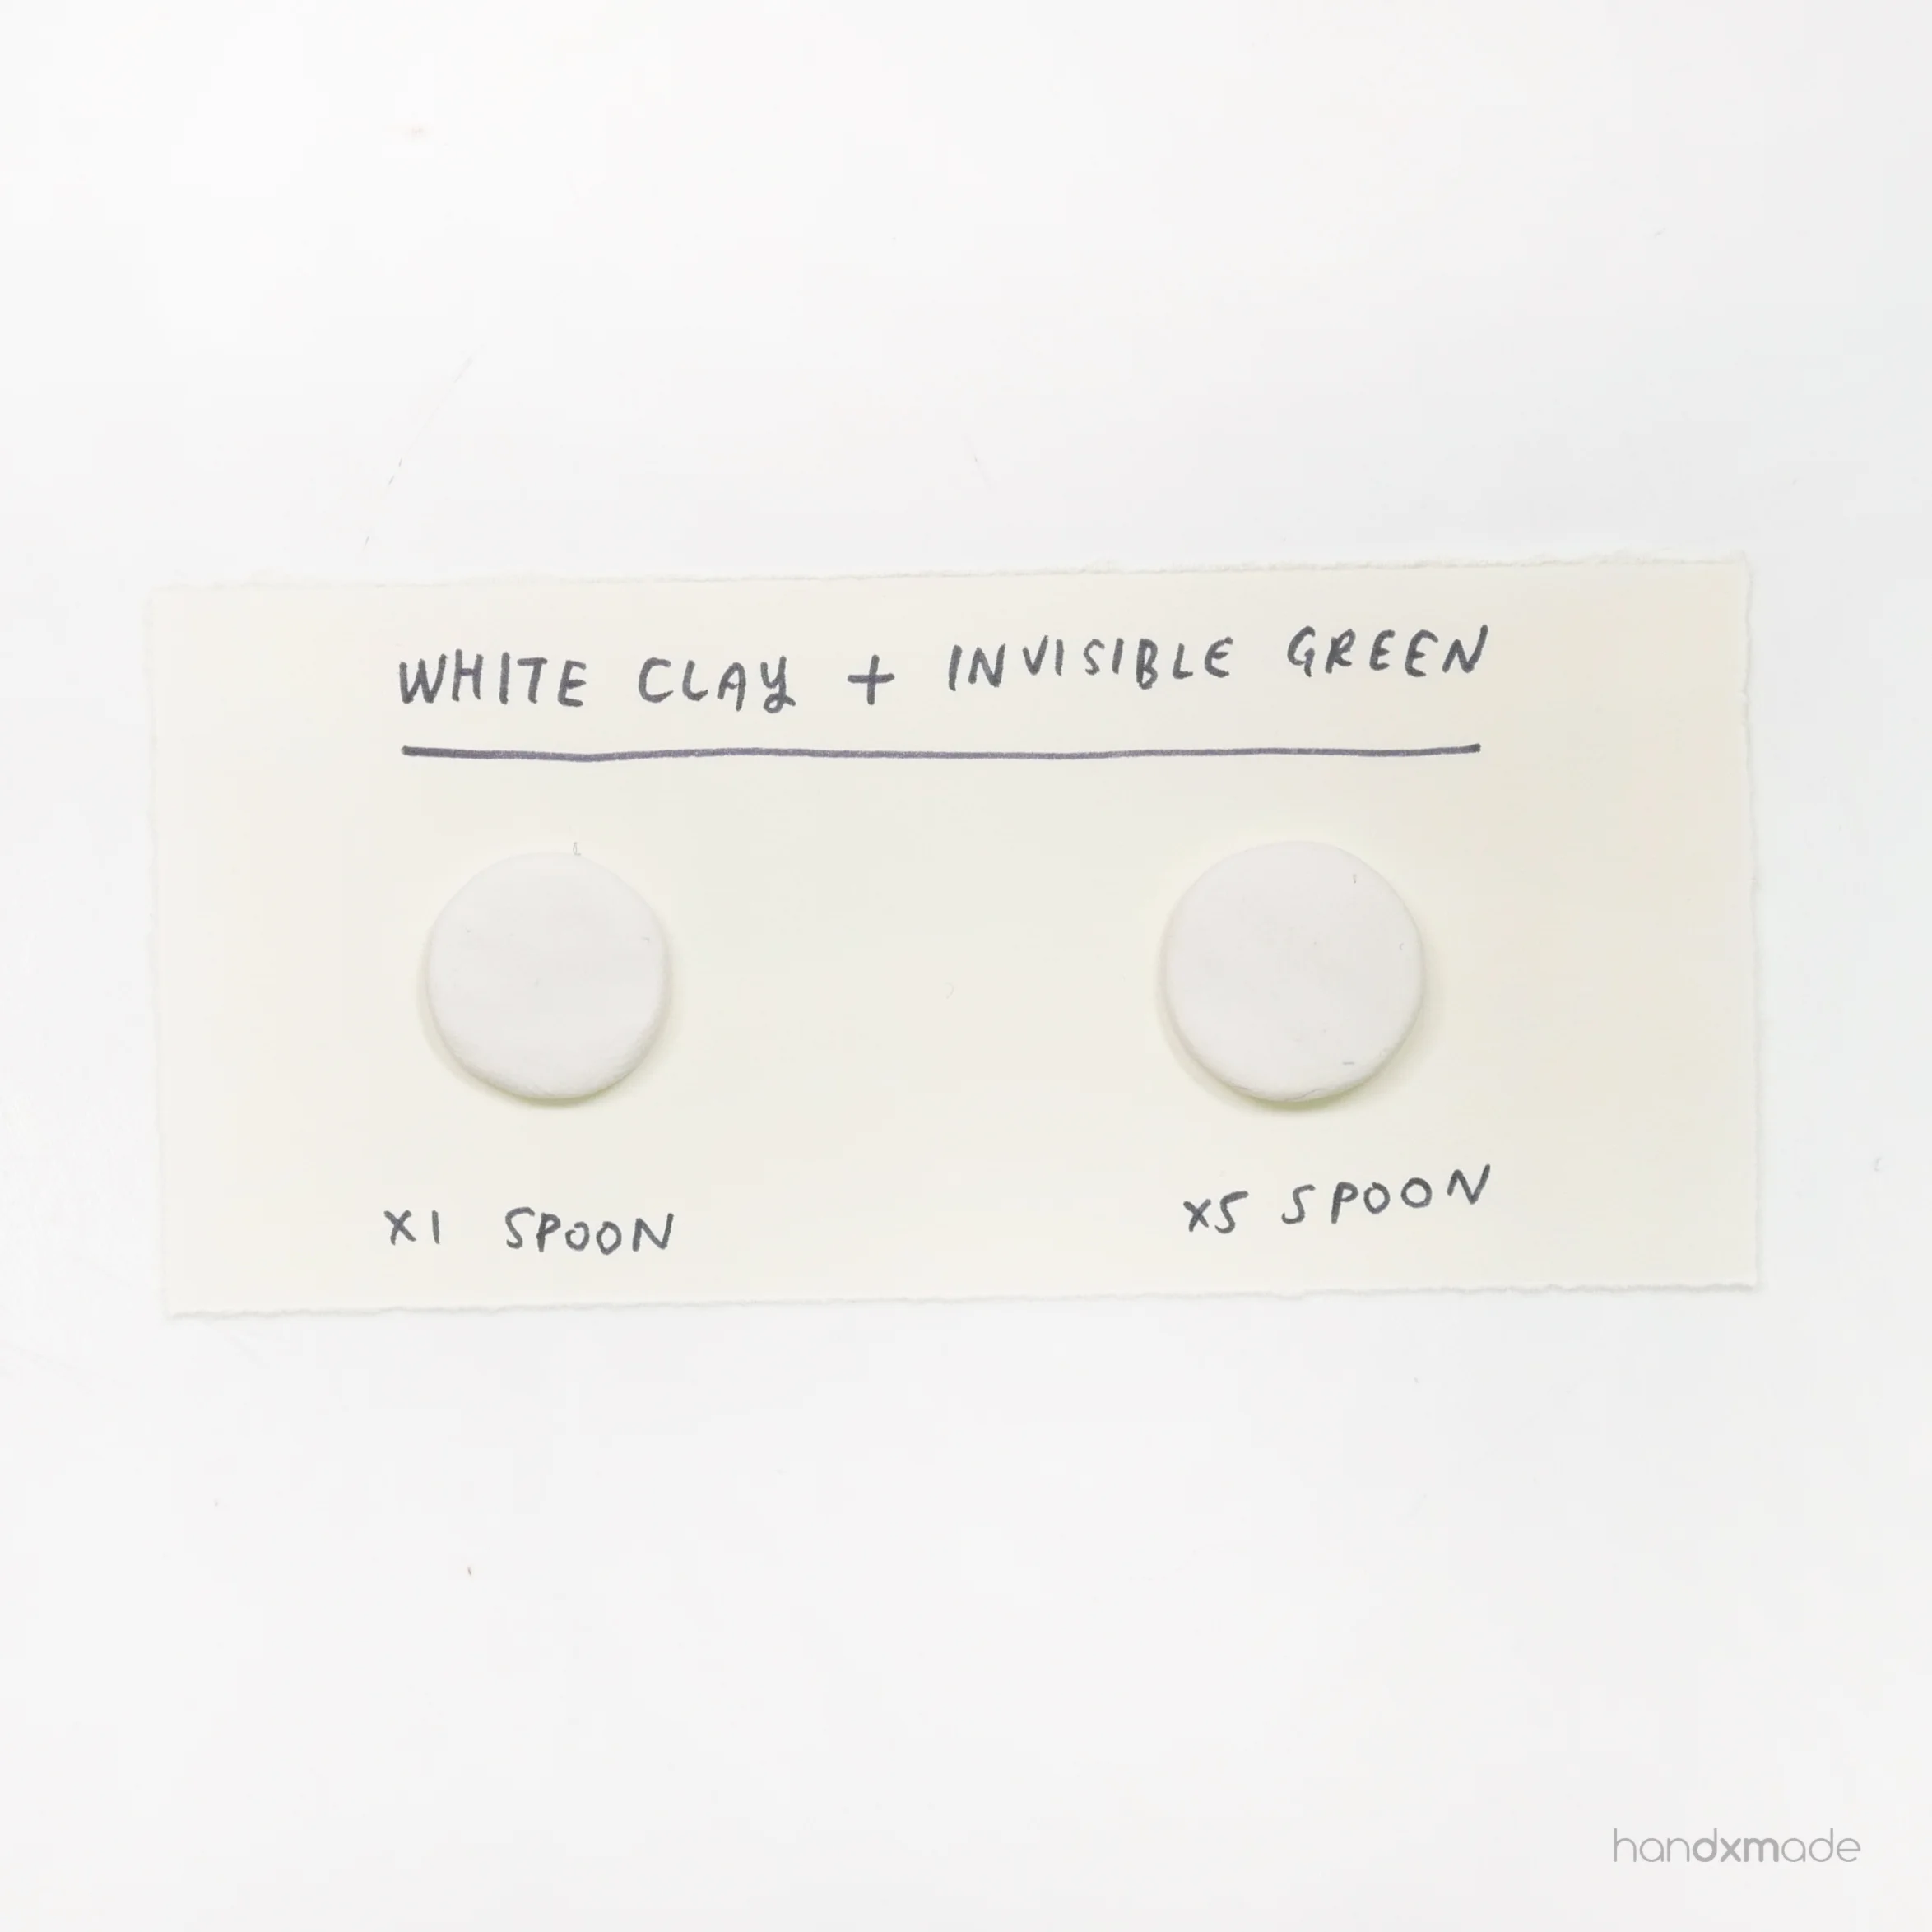

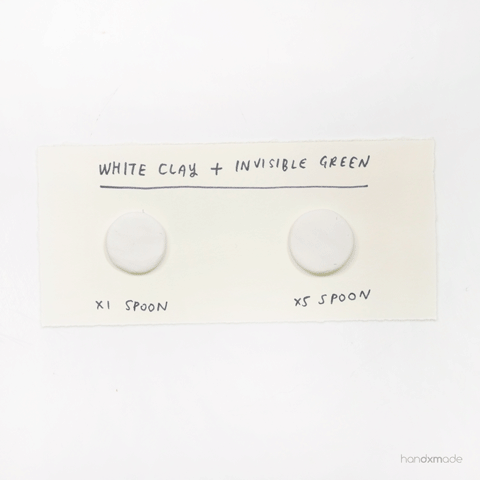
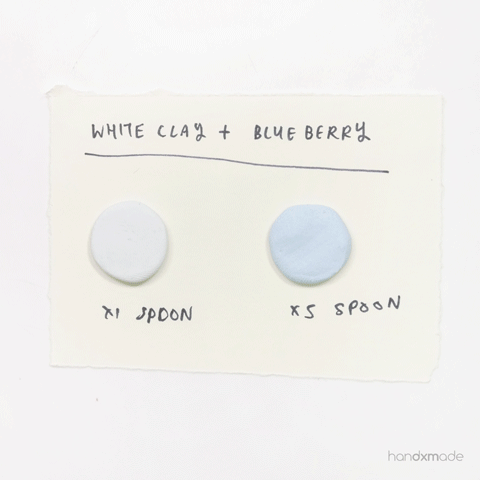
I also wanted to try mixing the glow dusts into clay, and the first thing I did was to mix it with white polymer clay. I was quite shocked to see that the glow was once again inconsistent, but realise that it actually makes sense as only some part of the glow dust would get light.
Adding more dust does help a bit, as you can see the one on the right had x5 spoon of glow dust on the same amount of clay. But….yep, inconsistent.


I tried the “non invisible” series, and as expected, the glow dust does change the clay’s colour! It can be mixed relatively evenly, but the glow will be inconsistent even if the colour looks okay.
GLOW DUST WITH TRANSLUCENT CLAY
Since I need the glow dusts to be able to get light throughout, I realised that using them with translucent clay was the solution!
I also realised that adding a drop of liquid clay would make the mixing process easier, as it provides a little bit of stickiness for the powders to stick together. You don’t want to add too much though, as you don’t want your clay in general to be too sticky - it’d be too difficult to handle and sculpt with.
Here’s how I’d take the powder with the tiny spoon. I make sure that the powder is tared to the spoon as much as possible so the measurements would be as accurate as possible.
I then pour it on the liquid clay, and mix the powder with the liquid clay.
Then using my fingers to mix everything together, even the powders on the spoon! It also cleans the spoon at the same time TWO BIRDS ONE STONE hahaha.


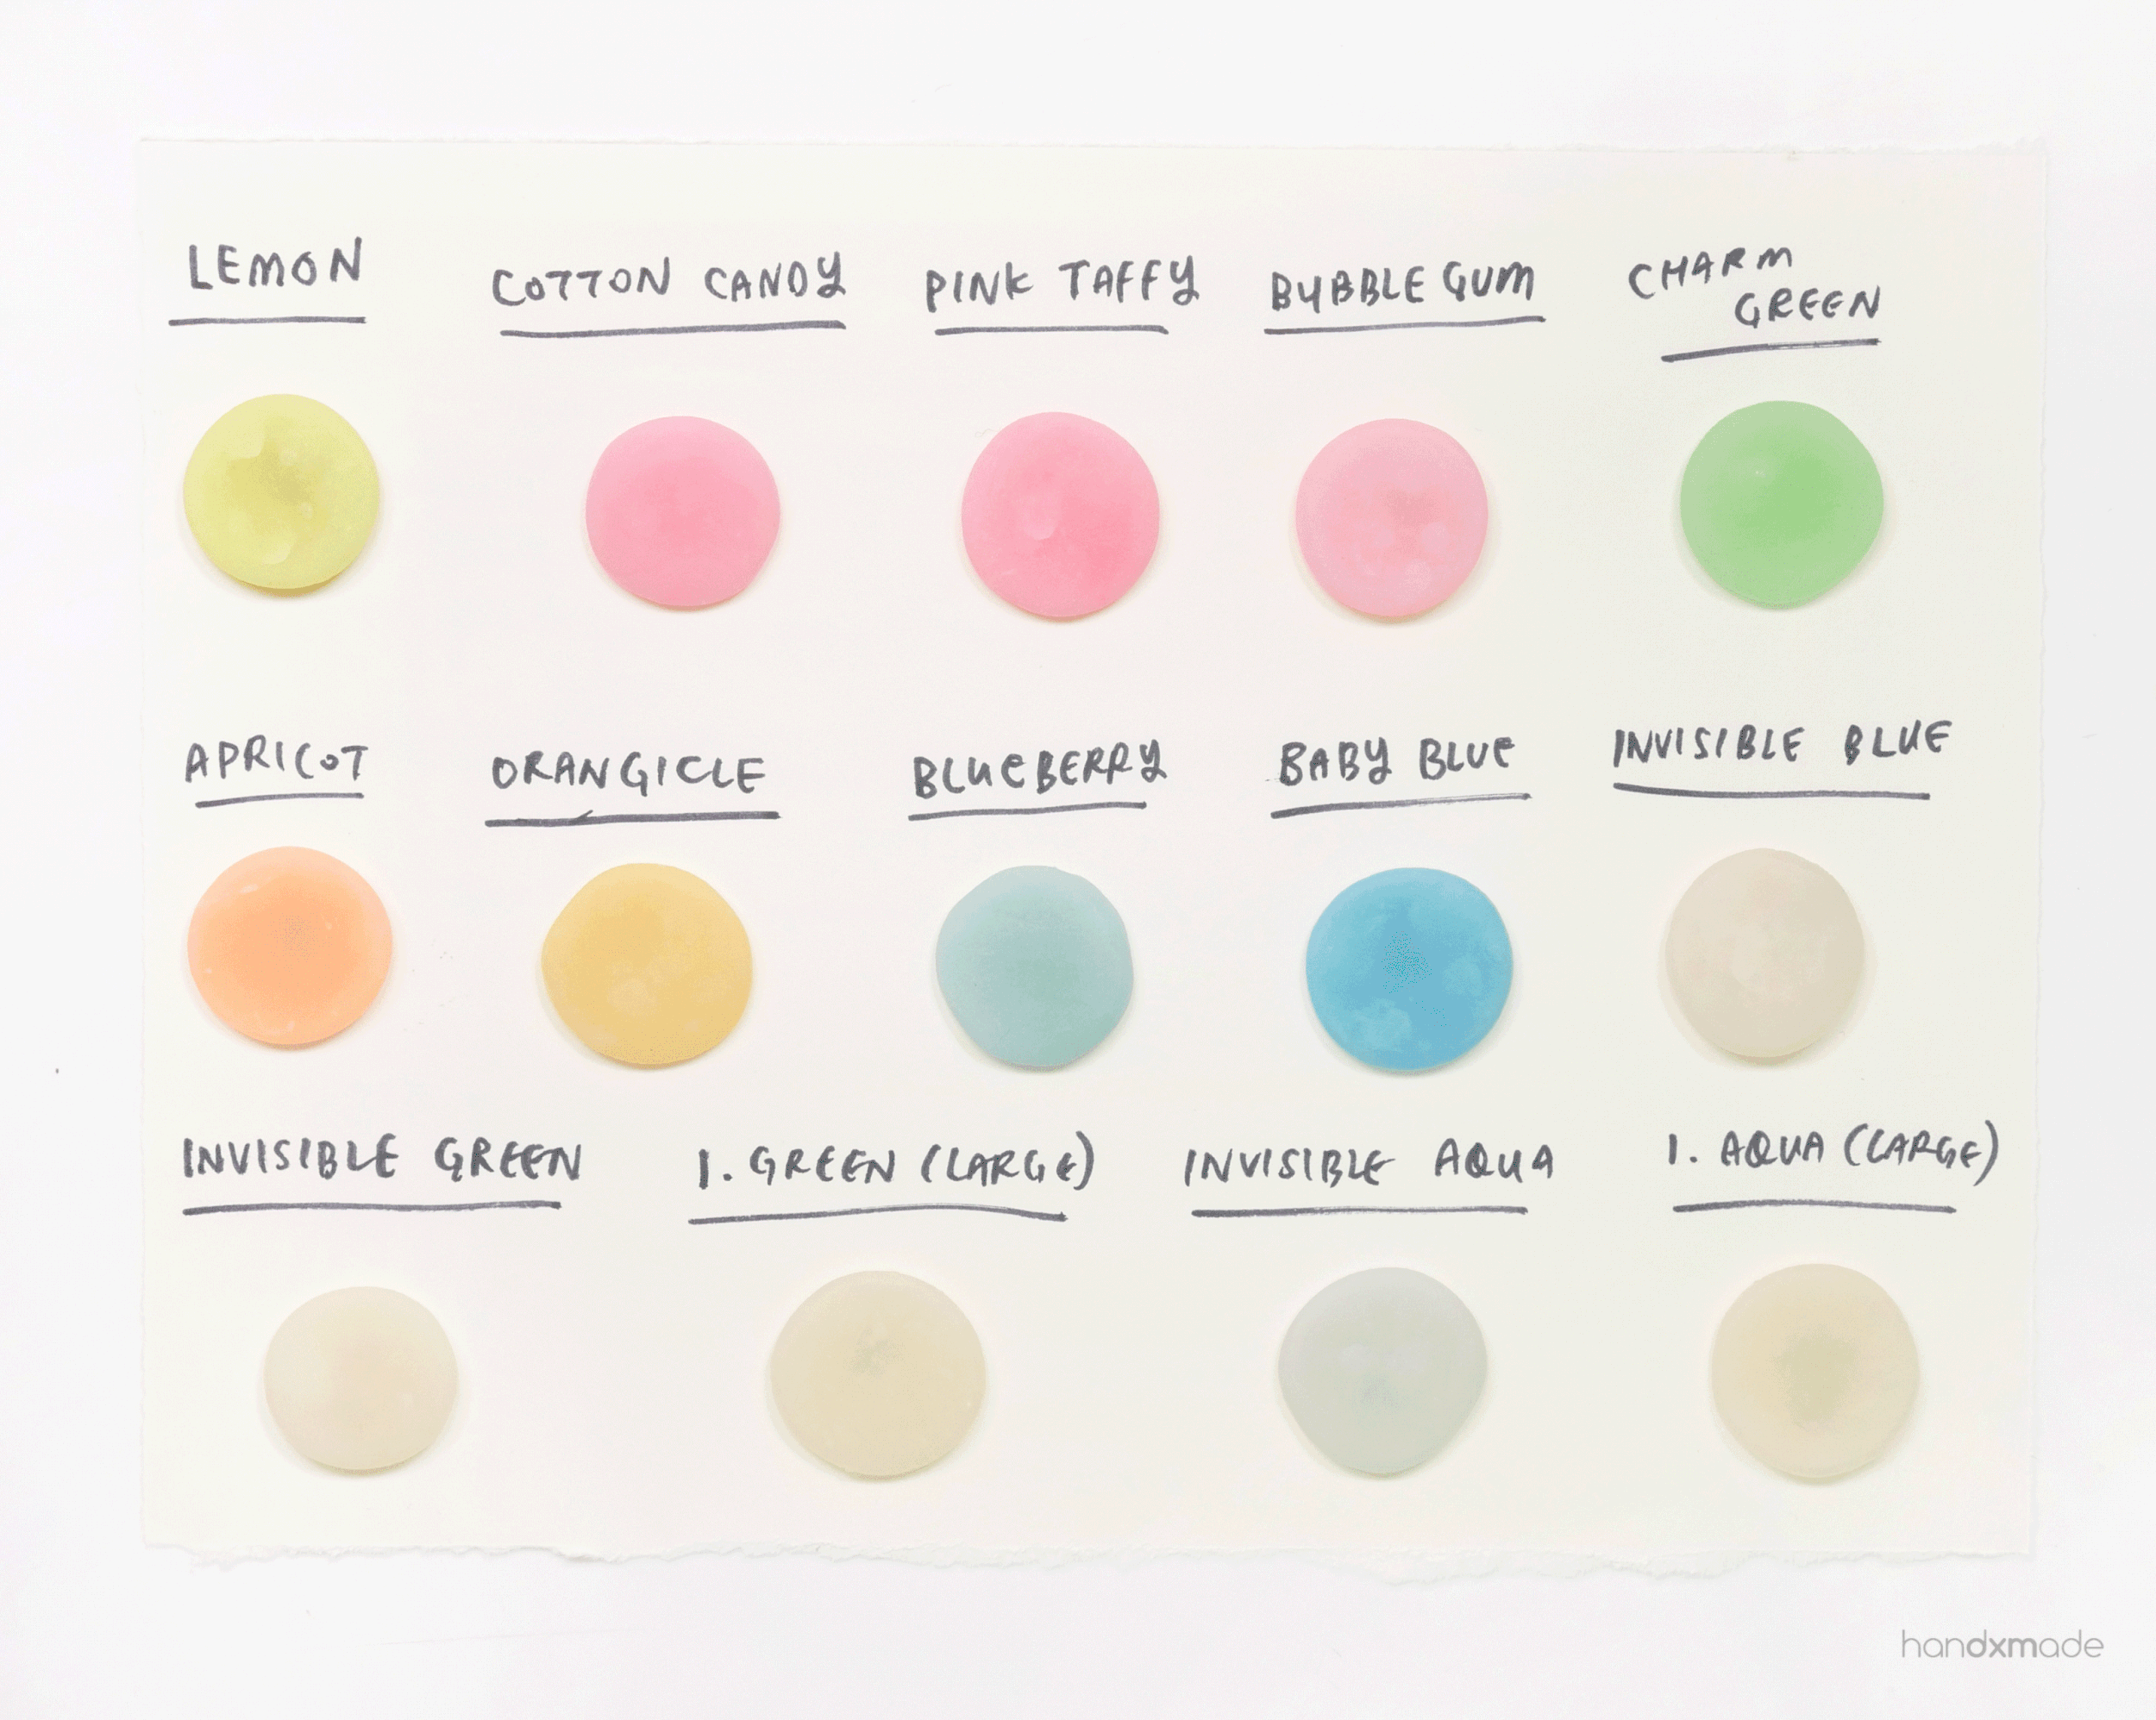
Repeat another 13 times for the rest of the colours, and this is the colour chart!
I was quite surprised to see that “Bubble Gum” doesn’t seem to have any glow effect at all?? (Maybe I got a dud…but the powder itself glows so I’m not so sure.) “Charm Green” is kinda mild too. The brightest is actually “Invisible Green”, and seems like the glow itself only turns orange, green, and blue glows in different shades, no matter what the powder’s colour was.
Translucent clay also has the tendency to get mooning (the white spots you see on the clay). If you look at the glow version, the mooning actually doesn’t affect the glow much which is pretty curious to me haha.
Initially I was wondering how the “large particles” would be useful since they can’t be mixed completely with the clay, but after seeing this test, I’m so glad I got them as samples! They look so beautiful, almost like stars 😍It has the night sky vibe, don’t you think? I especially like the “Invisible Aqua (large particles)” one!


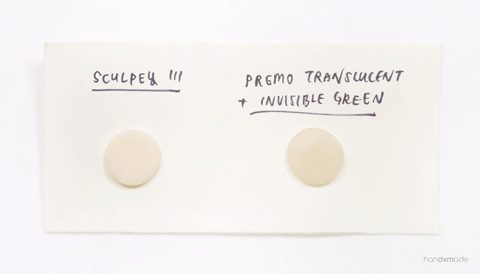
I wanted to compare mixing the dust with translucent clay over glow-in-the-dark Sculpey III, as that’s one of the clay in the market that has this feature.
I personally never really used much of this clay despite having it because:
1. Sculpey III is really hard to work with - it’s TOO soft in my opinion
2. It’s really fragile after baking, like, REALLY FRAGILE. I really wouldn’t waste my time making something painstakingly with this clay only to have it break so I just avoid using this clay by itself altogether.
As you can see, Sculpey III really can’t compare with Solar Color Dust. And it’s just ONE TINY SPOON of glow dust 😱 Granted, “Invisible Green” IS the brightest out of the lot, but if you want to add anymore colour to Sculpey III, it would also reduce the glow. Solar Colour Dust also have different colour glows so yes, 100% will use this over Sculpey III’s glow-in-the-dark clay!
However, it’s not all pros on Solar Color Dust’s glow dusts though. Unable to use it on opaque clays means that you can only rely on the colour of the dust itself for the main colour - which could be quite limiting (essentially only 9 colours!) Yes, you can mix some of the colours (more about that later), but that means if you want a black clay to have a glow, you’d have to find another solution to that 🤔
Also, mooning on translucent clay really isn’t pretty 🤷🏻♀️
INCREASING DUST DOSAGE ON CLAY
I wanted to see if increasing dosage of powder vs clay would increase the intensity of both colour in clay and the glow. In this sped up GIF I am taking 10 spoon of powder, which as you can see, covers pretty much the whole (flattened down) clay, or maybe even more!
It takes quiteeeee a bit of effort to mix it in too 🤣(GIF is sped up quite a bit)


Here’s the result! Adding more powder vs clay helps with the mooning from the translucent clay - which is great news! More powder also means much intense glow too which is so, so beautiful.


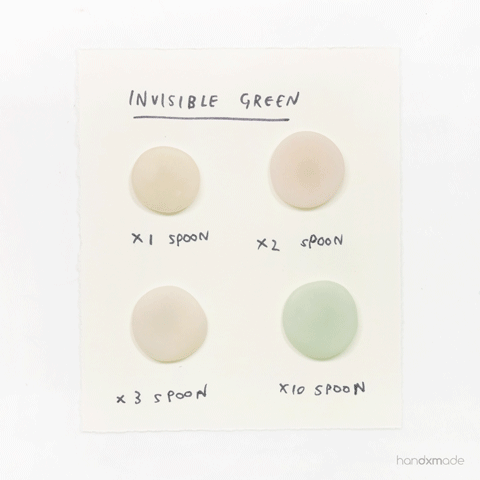
This “Invisible Green”’s glow is really super powderful (see what i did there? lmao) I swear look at it!! 😍
It’s almost blinding wow.


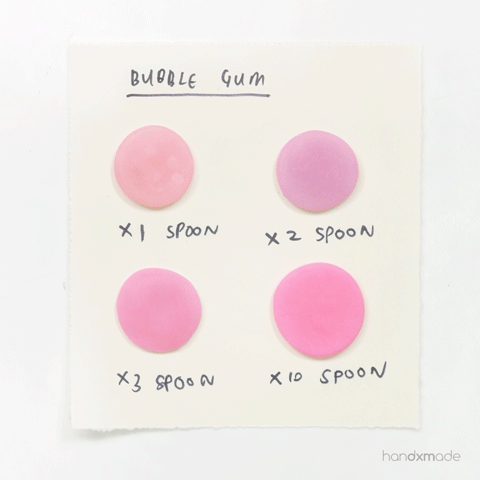
I wanted to give “Bubble Gum” another try, so I did this test too. Unfortunately it was pretty underwhelming. Which is such a shame because it’s the only one with a purple glow! ☹️
GLOW DUST WITH LIQUID CLAY
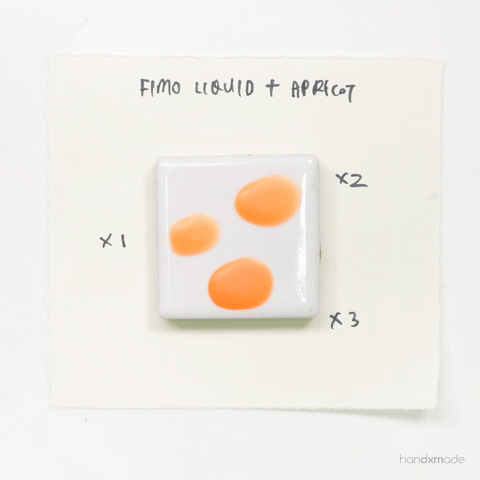
Since FIMO liquid clay is translucent too, I decided to try it out and see how it fares! (oppsies at the powder spillage hahahhaa)
The max I can do is actually one drop of FIMO liquid clay to 3 spoon! Anymore the liquid clay actually becomes too sticky to really work with haha.
The texture of the 3 spoon powdered mix actually kinda feels like what mixing raw clay with liquid clay feels like! (Fake chocolate sauce anyone? Hahaha) So this shows that the powder does have density (duh, haha), which means it would change the texture of the liquid clay.


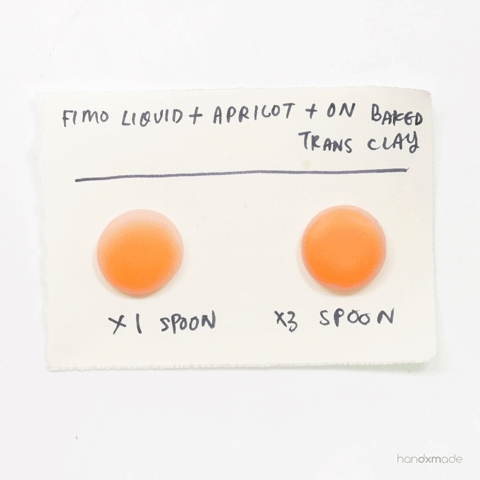
Results after baking! The colour actually changed a little? Looks more like what the glow colour is, instead of the powder’s colour 🤔🤔🤔
I also wanted to try to see how it would look like putting on baked clay! Seems to work pretty well actually.
Here you can sense how different the 3 spoon mixture is compared to just 1 spoon of powder!
Colour is also a bit more intense with the 3 spoon mixture (the one on the right). It kinda looks delicious honestly 🤣


Here are the results! 🥰
MIXING DIFFERENT GLOW DUST
FOR DIFFERENT COLOURS
I was curious if the standard colour mixing would work for the dust, and was pleasantly surprised at how they turn out! 😍
I used 1 spoon of each colour though, so it’s 2 spoon vs same amount of clay.


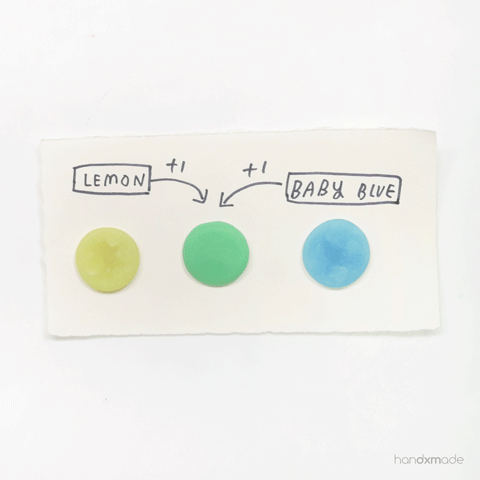
Here’s the two colours beside the mixed colour as comparison! Even the glow changes colour 😯😍✨
Also, seems like 2 spoon of powder would fix the mooning problem weeeee.
Mixing similar shades of colour to get an in between!


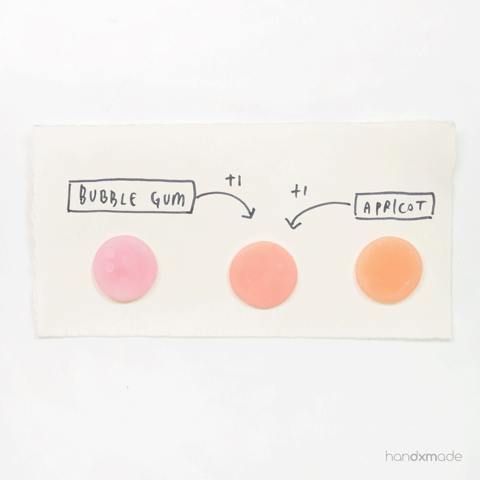
This was actually a pleasant surprise - I forgot “Bubble Gum”’s glow was basically non-existent and should have used another colour, BUT LOOK GUYS. The one in the middle (SUCH A PRETTY CORAL COLOUR 😍) actually glowed! Now I’m thinking maybe the “Bubble Gum” is missing some reactive agent that helps it glow or something? I might have gotten a dud 🤔 Maybe I’ll purchase it again when I buy more (possibly other pigments?? ahem ahem) from them!

That’s all I have for now! 💕 Hope this article has been useful and helpful for you! It was fun making all the test and seeing all the different effects from each powder. Let me know your thoughts, and if this has convinced you to get some glow dust from them! 🤣