
BAKING POLYMER CLAY
This article by @handxmade is free for personal use ONLY, any reproduction is prohibited.
If you’d like to show your appreciation for these articles through monetary means, you can send me a ko-fi! ☕️
Baking polymer clay is actually a pretty annoying thing imo. I loved how the clay doesn't dry up UNTIL you bake it, but if you bake it wrongly, either the clay will be fragile, or it might get burnt?!? 😭
Here are some of the things I do to prevent certain things from happening during the baking process, while making the baked polymer clay as durable as possible! It may or may not work for you (seriously, the oven makes a huge difference), but I hope this will give you some insight on how to bake your clay better!
COVER YOUR CLAY
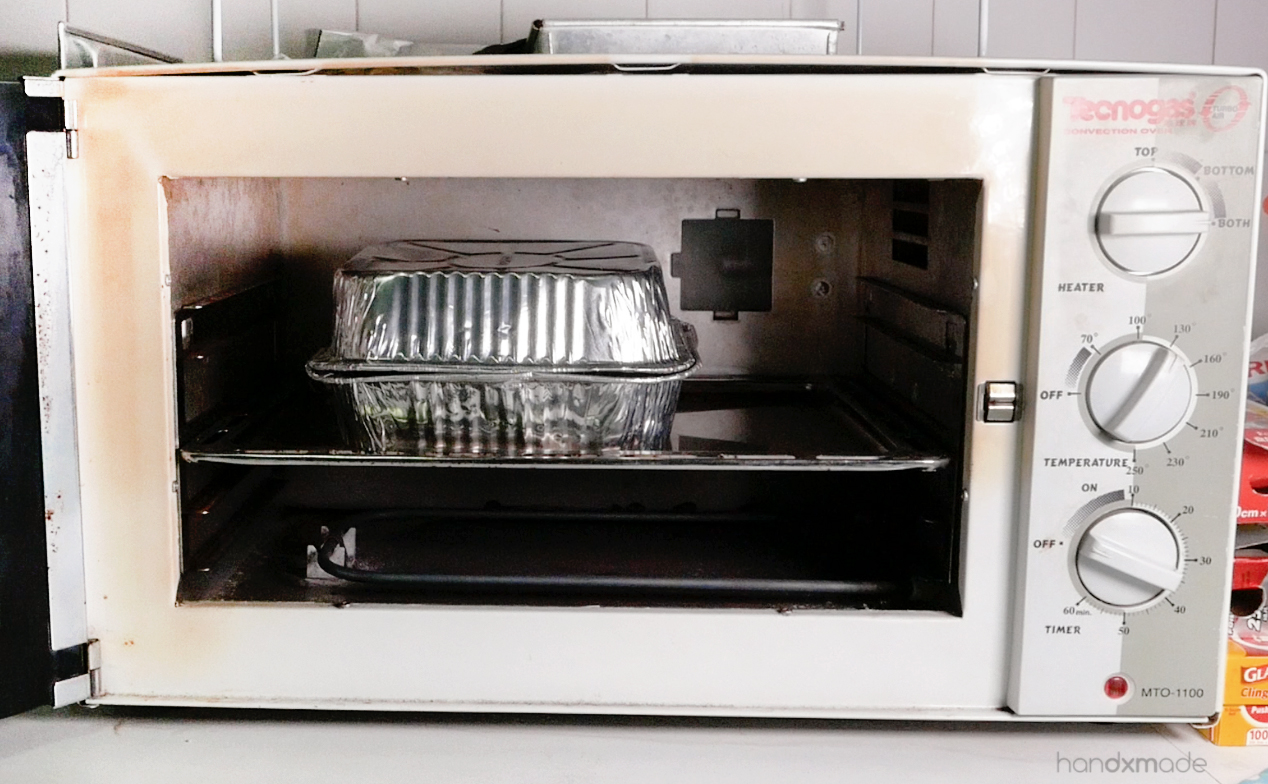
The very first thing is to get these aluminium pans from your local bakery store! You'll need two of them, one will be at the bottom to hold everything (unless you'll put it in the oven for forever, which is fine too), and the other one will lay on top of the other, covering your creation!
You can just use normal aluminium foil and make a "tent" out of it to cover your clay pieces, but I like to know how much space I have to put my clay in! 😊
This prevents burning your clay from happening, and this is actually VERY important! I once forgot to cover and my creation was burnt even though the temperature was about the same 😱
Even though it doesn't guarantee that your creation won't get burnt as it still will if the temperature is toooo high, but at least it will prevent burning at like, 100 degree?? (most clay needs to be baked at 130 degree for it to be baked properly)
MORE CONSISTENT TEMPERATURE
I always put a ceramic tile at the bottom of my pieces, because the ceramic tile holds heat and releases it steadily, so it helps your oven to maintain a more consistent temperature.
NO SHINY SPOTS
However, baking a clay piece directly on the ceramic tile will make your clay shiny since the tile itself is glossy! So I always put a piece of paper on top.
And yessss your can bake paper! In fact, you actually can bake a lot of things and it wouldn't burn (but try with caution haha), at least now you know you can bake paper 😊
NOTE:
Even though polymer clay doesn't expand/shrink after baking, sometimes any hole that you make does shrink just that slightly! It's not exactly obvious with your eyes, but if you intended to put something through (for example a headpin), it WILL NOT FIT. In this case, bake the headpin or whatever you made the hole with (yes you can bake metal too), and it should resolve this problem 😊

The paper on the left was used for more than a year LOL. I didn't change it because I'm lazy, but it still works and it doesn't necessarily transfer the colour to my clay pieces etc so it's actually alright!
Here's an example of how the clay piece will look like if you bake it on a ceramic tile. As you can see, there's some glossiness on the clay, and it's not even either.
On the right is the piece I baked on top of a paper. Both sides looks exactly the same! 😊
OVEN
For the type of oven, you can use a toaster oven (not recommended because the heat element isn't that consistent) or a convection oven (the best for polymer clay because the way the heat moves makes it very consistent), BUT NOT a microwave oven.
Polymer clay is actually really safe, and even though apparently it does emit some fumes when you bake it which MIGHT be sensitive to some people, but I've had no problems with baking polymer clay. In fact, even when I burnt my clay, nothing really happened! I couldn't exactly see fumes coming out from the oven like in cartoons hahaha.
We actually use the same oven to cook too (when we actually do use it for food haha), but I think it's not a good idea to bake food TOGETHER with your clay creations so don't do that please! Just do it separately 😀 Make sure the tray you used for your creation is used solely for that purpose too! (Unless you're like me and the clay NEVER touches the tray haha)
My convection oven is actually bought 2nd hand from carousell.com for like....$30? It worked and I've already had it for 3 years! And it already looked so old and dirty before I got it so.....you really don't have to invest in a new one! That said, I was lucky enough to get a 2nd hand Japan one, and Japan's stuff is always more lasting right? Hahaha.
An oven's heat element tends to cycle on and off. It's like an air-conditioner, which switches off when the desired temperature has reached so it doesn't overheat, and it switches back on again when the temperature kind of drops. So because of that, an oven thermometer is actually very important to see the range of temperature your oven tends to be at! (My oven seems to be like that, I might be wrong so feel free to correct me if I am!)

My oven actually has a knob that says HEATER, which means they want me to choose which part of the heating element should light up (there's one on the top of my oven, and another one at the bottom!)
I don't think all ovens has this, but I actually had a bit of trouble at some point with this knob because I was unsure how I should put it.

I used to put the tray at the bottom, and put the HEATER on BOTTOM only.
But eventually I realised that it kinda makes my clay quite fragile and at that point of time I kind of stopped using my oven thermometer because I didn't really trust it HAHAHA. Either my oven really fluctuate so much.....or my thermometer is spoilt...or maybe a bit of both 😅
Either way, I was basically still doing tests while making all of my pieces, and occasionally I do proper tests to see which is better.
That's when I realised putting the tray in the middle and put the HEATING to BOTH kept the consistency better, and my clay pieces was definitely much more durable!
Also, do invest in this little handy silicone heat resistant thing! I actually found this in Daiso, thinking maybeeeee it'd be helpful but wasn't very sure. But now I use it every single time!
Mittens are huge and hard to control what you're taking. It works well for tray but not when you have so little space! So this little silicone heat resistant thing actually makes it easy to grab the top of the aluminium tray, and I'd reach in with my other hand to get my creations!
Everything would still be scorching hot by then, so be careful still!
TEMPERATURE TESTS
I decided to do some testing with the brand of polymer clays I always use with my oven, to show you how I do it, so if you ever want to do your own experiment, you'd know what to do! 😊
First thing I did was to grab a few piece of paper, cut white clay (I use white because I want to see if there will be discolouration/burning, which occurs very commonly/more obviously with white clay) and write down all the necessary information on the paper!
Remember to WRITE EVERYTHING DOWN because trust me, you WILL forget hahaha.
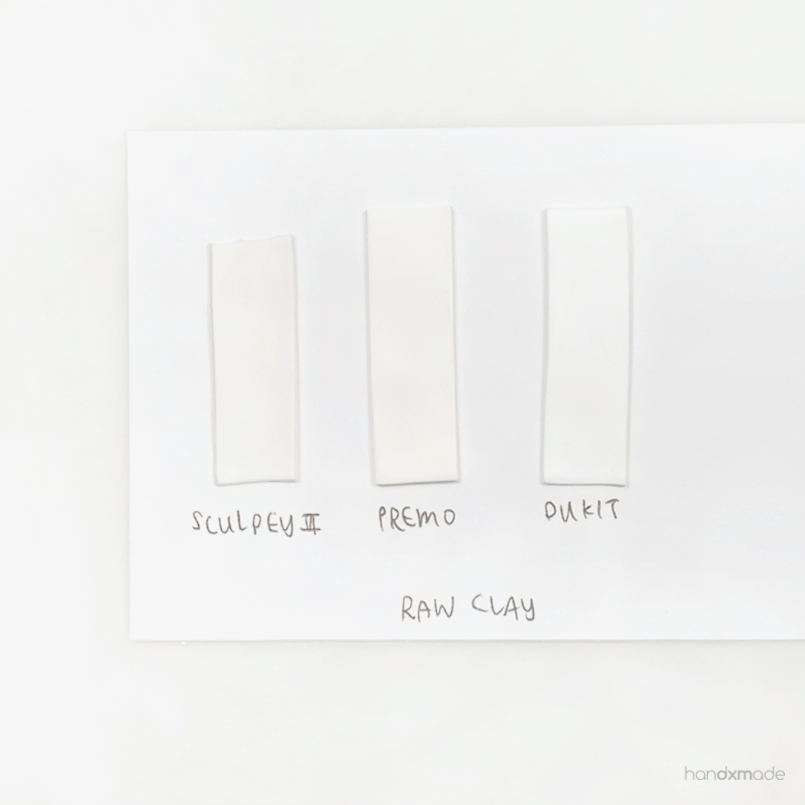
Since I primarily use only Sculpey III, Premo Sculpey, and Dukit clay, here's all three of them! I did not realise that all three of them actually looks really different on their own?? Sculpey III looks a little duller compared to the other two, and Dukit is the brightest, cleanest white.
I made a set with raw clay to again, check the discolouration if any on the baked clay!

If you're using different brands of clay, sometimes they have different baking instructions! Fortunately for me, all three brand's required baking temperature is 130 degree Celsius.
All my pieces are actually 1mm in depth only, and I baked them for at least 50min to 1 hour. I always do that for my creations! (If your oven is more prone to burning your pieces, you can consider baking it at a lower temperature but baking longer, it helps.)
NOTE: I've read that you should let the clay cool down completely inside the oven after they're done baking, or even throwing them into a bowl filled with ice to stop the baking process, and many people has different experience and suggests different things. For this test, I just brought the pieces back in my room (with air-conditioning switched on) when they were done. Most of the time they were still pretty warm!
This MIGHT affect the result of the test compared to if I let it cool down completely in the oven (which I do sometimes when I'm done for the day and stop working), so just to let you guys know!
The very first test! I set my oven at 130 degrees, but as you can see, sometimes it doesn't even reach the temperature on the knob. That's why it's important to get an oven thermometer! (Although I kindaaaaaa suspect my oven thermometer is a little off but we'll just follow it for this test. Seriously though, how do you know whether if a thermometer is spoilt or not? 😅)
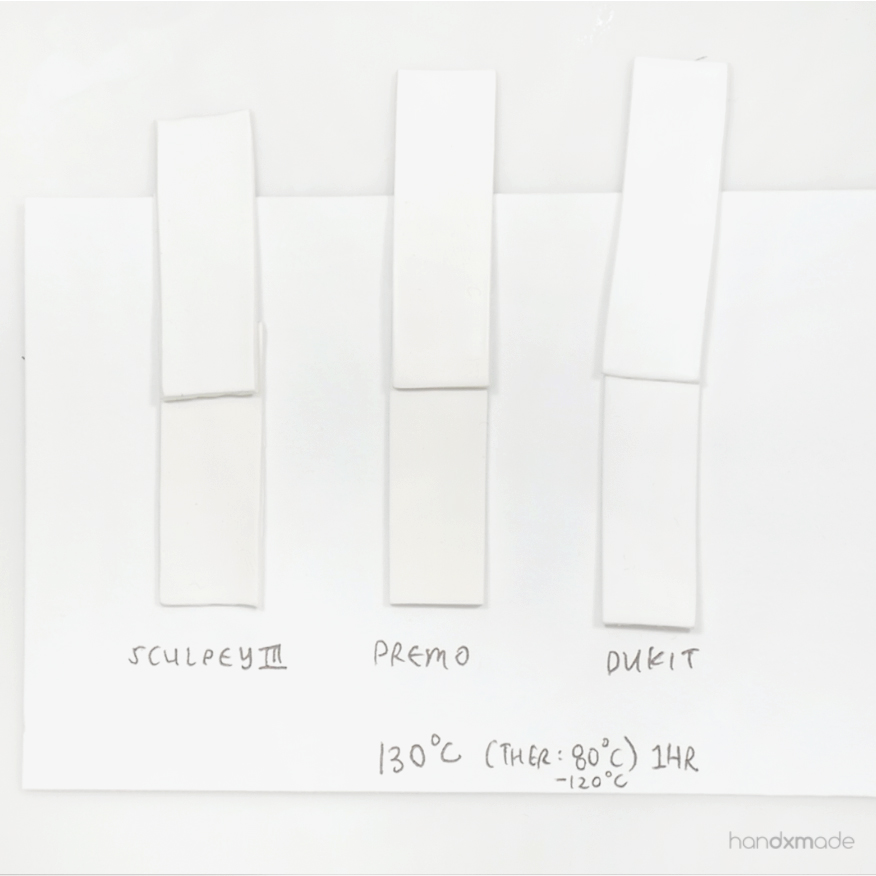
Here's the end product!
I wrote 130 degrees as the number I see on the knob, and the numbers in the brackets are basically the number I saw on the thermometer! Which means it reached 80 degree at some point, and the maximum I saw was 120 degrees. It could have fluctuate a lot more but these were the numbers I saw (I went to check on the oven every 15-20min or so).
I put the raw clay on top of the baked clay to see the colour difference (there's quite a bit of difference even though the highest temperature I saw it reached was 120 degree hmmm)
Here's the break test! As you can see, Sculpey III (which I know will definitely break haha) broke without me every trying, Premo could sustain a little bit of bending before it broke, and Dukit too.
Next up is 145 degree!
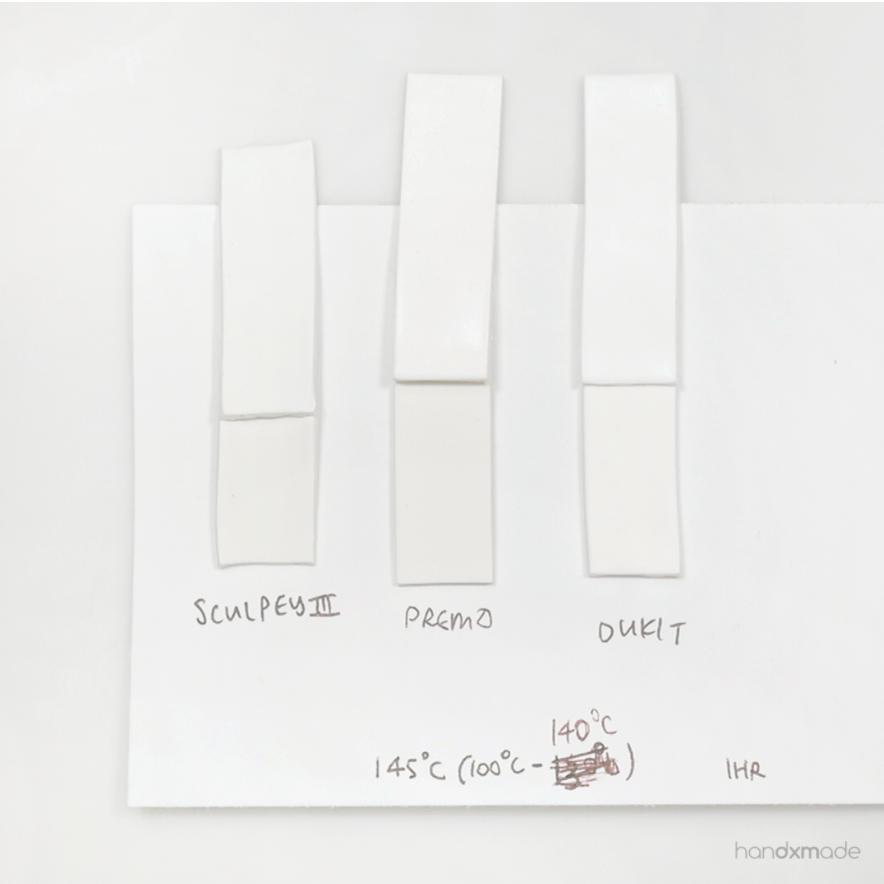
Surprisingly, it actually got pretty near 145 degrees! Maybe it actually reached but I missed it hmmm but this is the records that I have.
I think the discolouration isn't that terrible here, and all three whites ended up looking quite similar!
I've read somewhere that clay doesn't really get burnt until it extents maybe 145 degree or so? Maybe this could be an optimal temperature hmm.
But everything ended up breaking anyway I was quite disappointed haha.
Although Premo took a bit more effort to break, and Dukit was really quite durable until the end where it gave way anyway :( I really had to fold it though! I would say this is quite a success already. If one wants to break something you really can't control that hahahaha.
Next test: 150 degrees (or so)
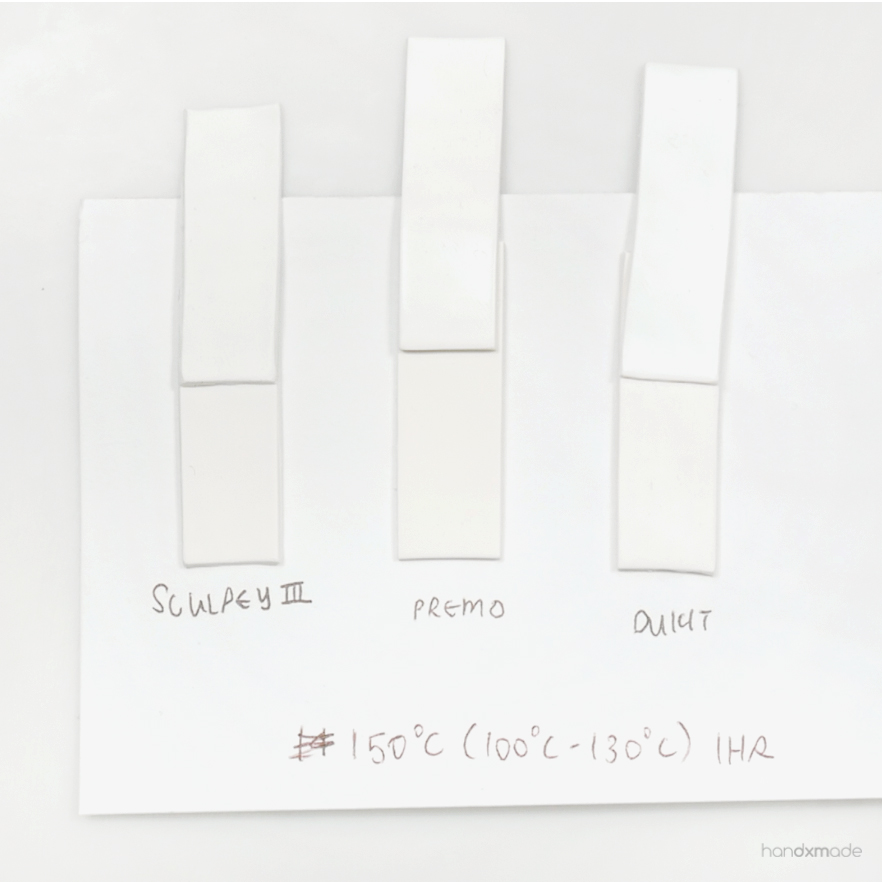
Discolouration still not that bad, but maybe because the temperature was like 100 degrees to 130 degrees?? Maybe I missed the highest point of the temperature hmm.

Here's a comparison of the previous test (145 degrees). I think Premo and Dukit does look a little bit darker!
Sculpey III broke as expected, and I think Dukit's durability was about the same as the 145 degrees test! Premo somehow broke quite easily here :(
I really was trying my best to break them hahaha.
160 degrees!
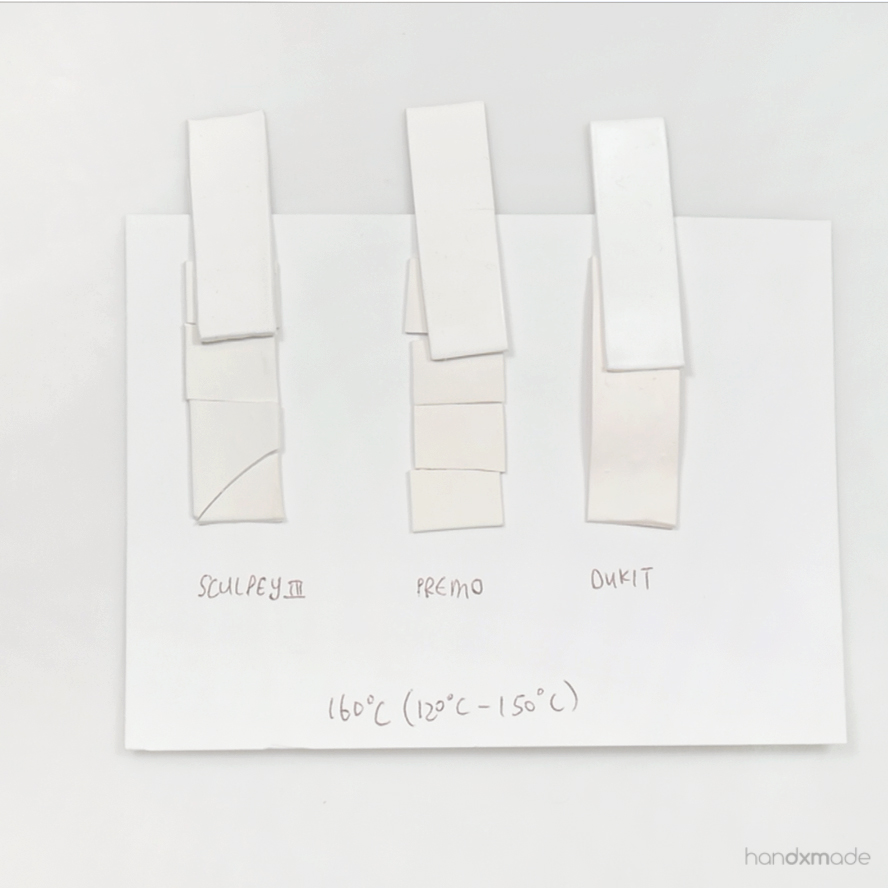
Sorry I forgot to take a shot of the discolouration before breaking it so now you know which one broke HAHAA.
The discolouration here was quite obvious. Dukit become more pinkish for some reason!
This time round, I realllly couldn't break the Dukit piece! 😱
But the discolouration was a little too much in my opinion.....so unfortunate :(
I didn't try between 150 degrees to 160 degrees, maybe I will in the future!
The last test, 175 degrees because I really wanted to burn the clay pieces HAHAHA.

Look at how burnt Sculpey III is!!! Hahahahaha. This time I actually saw the oven spiked to 160 degrees! So it was definitely gonna get brown hehe.
You can also see how Dukit has more of a pinkish hue when it's burnt hmmmm. I also noticed some bumps on the surface of Dukit, not sure whether the clay had air bubbles or it's some sort of reaction with the high temperature?

Comparison with the previous test (150 degrees)
This time I couldn't break Premo clay too, and of course Dukit hahahaa.
I think when polymer clay gets slightly overbaked.....it does get a bit more durable! But I'm not sure if I will be comfortable with the discolouration :<

Unfortunately, after trying a bit more time with Premo, I realised there was some cracks from all the bending and in the end it broke on those cracks..... Oh man..
Ah well! I have a feeling the spiking and cooling of the oven is a little bit too random and the difference of the lowest temperature in the oven and the warmest is too wide. It probably affected the durability, so I'll be sure to try again when (if) I have the extra cash to invest in a better convection oven.
Do note that I was really TRYING VERY HARD to break it, and usually you wouldn't really do that will you? Hahaha. Usually the pieces would also be thick enough so you can't even bend it, but it's nice to know how durable thinner pieces can be!
I believe that I can definitely find the sweet spot for baking my creations eventually, but right now...I'd probably stick to 130 degrees or 145 degrees or even in between, because I just can't deal with too much discolouration and it seems like a good spot.
I shall also get another oven thermometer soon too.....
BAKING ROUNDED PIECES
Most people who make jewelry usually tend to make beads etc. For those, they actually have a bead holder that you can bake with! However, it makes use of the holes in the beads (basically putting a metal rod/skewer though the hole in the beads and hanging it) so it doesn't really work for a complete piece which has a rounded bottom and no hole to take advantage of.
So what you can do is to fold a little paper box, dump tons of corn starch in it (enough so that the bead rests on corn starch and doesn't touch the bottom), and it should keep the bottom rounded!
I've also heard of a ceramic fibre blanket (which means it's all fibre and rounded pieces wouldn't get flattened!!) but I couldn't find any in Singapore and I just haven't buy any online yet. If I do, I'll make sure I'll update this space on how it fares!
After baking, some corn starch might be still on the clay, but it can be easily rubbed off with your fingers 😊
BAKING BAKED POLYMER CLAY
Sometimes you need to work on a baked piece, and sometimes it's not a flat piece so you can't exactly place it flat again. Or you just need to make sure the pieces doesn't roll all over.
For that purpose, I used to use blutack and stick the baked piece on it, then on a piece of paper!
After baking there will be some residue left on the clay, but it's easily removed with the same blutack.
HOWEVER, blutack softens A LOT during baking and I've realise that my bigger pieces would bend and sometimes because of that it broke my pieces!! 😭
Also, I noticed that sometimes the part where the blutack was at would leave a slight crack...I'm guessing that it could be because it's so sticky, and it didn't allow the clay to "breathe" during the baking process, and maybe because of that, any air bubbles in the clay might have been "forced out" and led to the crack?
Either way, even though it doesn't happen as often, I found myself to not use blutack at all just in case......cracks are really a hassle and even though you CAN fix cracks, it's really time consuming! 😣
However, when I purchased a rubber stamp carving kit, one of the item inside the kit was this kneadable eraser that is used to remove lead stain on the finished rubber stamp.
(If you're interested in how the kit was, you can read about it here and see the rubber stamps I made! 😊)
I have NEVER touched something like this before, I had kneadable erasers for drawings so those were actually really sticky so soft?? These weren't and yet it was so kneadable! It really felt like I was kneading an....eraser HAHAA. I don't know how else to explain it 😭 It felt powdery but it wasn't etc. Just very interesting hahaa.
So one day I decided to try and see how it will fare to be used for this exact reason, and it actually turned out pretty good? I don't think it moved when it was being baked, and even though it isn't THAT sticky (which could be a good thing in this case), the clay piece still stuck on the rubber pretty well!
You can see me struggling a bit to put it on the paper haha because it really isn't stickyyyyy.
I haven't tried it long enough to deem it perfect for this situation, but the 3-4 tries I use it was pretty successful! Will update if anything happens to it hahaha.
Hope all these information and tests will help you with your own baking experience with polymer clay! It really requires some test and trial because each oven is different, but at least you know how to start your own experiments! 😊