
MAGNETS + CARVING GOUGE TOOL + DRILL BITS
This article by @handxmade is free for personal use ONLY, any reproduction is prohibited.
If you’d like to show your appreciation for these articles through monetary means, you can send me a ko-fi! ☕️
Recently I've been embedding magnets in my clay creations - I just feel like if they're not useful (like pen rest etc), they have to at least be interactive for me. So I thought maybe I'll write about magnets and how I use them for my creation + some tips! 😊
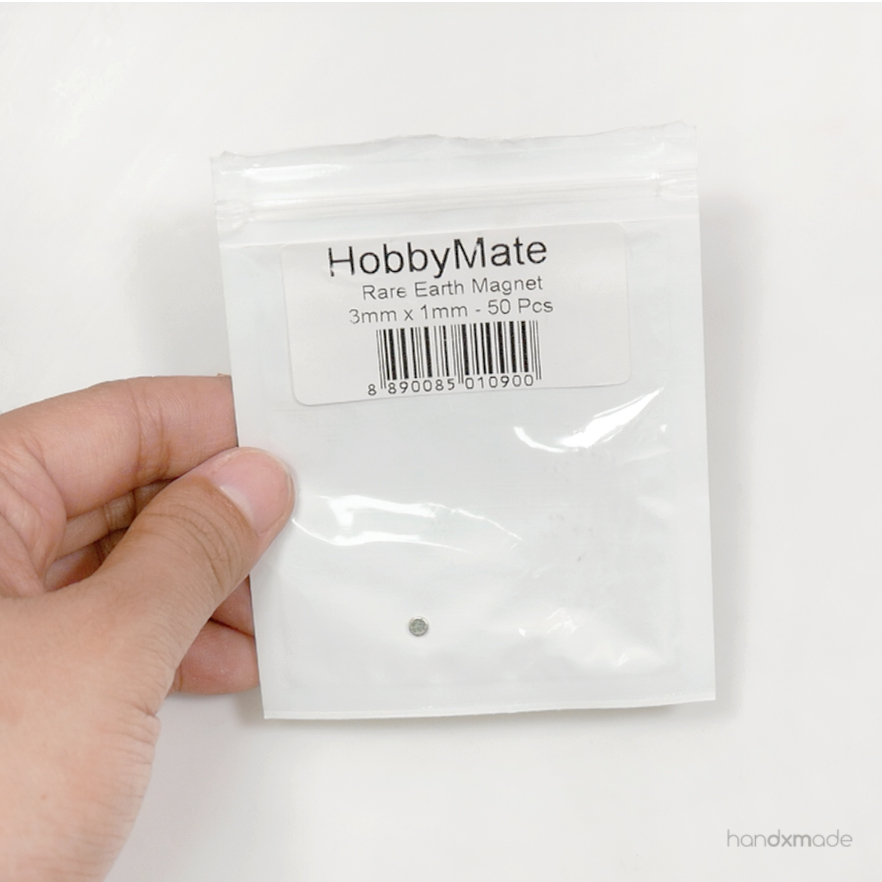
Now there are a lot of magnets available, but the better ones are call Rare Earth Magnets. It's not as good as the one I have down below, but I needed tiny ones and these were the smallest one I found 😊
Here's a little description for Rare Earth Magnets:
"Rare-earth magnets are strong permanent magnets made from alloys of rare-earth elements (elements in the lanthanide series, plus scandium and yttrium). Developed in the 1970s and 1980s, rare-earth magnets are the strongest type of permanent magnets made, producing significantly stronger magnetic fields than other types such as ferrite or alnico magnets."
I have no clue what it means, but I've tried other magnets and I assure you that these are really quite strong and reliable 😆 I bought these in a local hobby shop call HobbyMate, and I think they are fairly easy to purchase from online! (Sorry I only left one piece to show hahahah)
There are 3 main types of Rare Earth Magnets and that is Neodymium, SMCO, and Ceramics.
This particular one doesn't say what type of Rare Earth Magnet it is....But I have a feeling it's Neodymium, which is the most common for Rare Earth Magnets (and also because they lose their magnetisation after baking). However, I think the alloys might be different or something because Neodymium should be stronger than SMCO (which is the strongest magnets I have out of the lot), so I'm not sure what's going on here 🤣 (DID I GET CHEATED? 🤔 I'm going to get legit Neodymium soon from Lifton Magnets (now Supreme Magnets) which I trust, and will do a comparison hahaha, will update when it arrives!)
"Neodymium has a lower resistance to thermal stress, which means that when it exceeds a certain temperature, it will lose its ability to function. The Tmax of neodymium magnets is 150 degrees Celsius, about half that of either samarium cobalt or ceramic." One of the excerpt from a helpful article I found explaining the types of Rare Earth Magnets if you're interested!
Since these are not that resistant to heat, I usually use them when I don't have to cover it up and glue it on baked clay instead! 😊

Now theseeeeee are 😍
They are call samarium–cobalt (SmCo) magnet, and it's actually a type of rare earth magnet. I bought them from Lifton Magnet in Singapore which means it's probably legit unlike the one above HAHA.
SMCO Rare Earth magnets are more heat resistant than most magnets and Neodymium Rare Earth magnets, and I actually made sure I did enough research to know that these are more commonly used with heat applications - which means I can bake them in the oven woohoo!
I got the smallest one that I could since I make miniatures, and the smallest one they have is 6mm x 1mm, and 6mm x 3mm. They're still too big for most things, but the magnetisation really cannot be compared. It's a shame they don't have any size smaller than these!
(Btw, I introduced this SMCO magnet to @aiclay and I think she baked the magnets a few times throughout the crafting process, and she updated me to let me know that the magnetisation DOES reduced a little after quite a bit of baking. So do take note of that! Usually baking it once doesn't really affect the magnet much imo. Thank you Jocelyn for the information!)
EMBEDDING MAGNETS IN RAW CLAY
Before I found out my preferred method (below), I used to just embed the magnet in raw clay like for my Golden Snitch. It works okay, but I really dislike it because it distorts the clay during the process, and even if you don't "hide" the magnet and just leave it embed, you HAVE to bake the clay with the magnet (since polymer clay does shrink enough to not let you fit whatever you wanted to fit after baking).
So for my HobbyMate Rare Earth Magnets...baking it really reduced the magnetisation so much 😟
Then one day, I found the answer to solve this problem! 😊
EMBEDDING MAGNETS ONTO BAKED CLAY
The HobbyMate's magnets like I said, isn't very strong especially after baking, so I already have the intention of just gluing it.
Now since we are putting the magnets on baked clay, it's best to use resin glue! I use resin glue to do this because it's the besttttttt. (I'll be writing an article about glue for baked polymer clay next week!)
I use a toothpick to mix and apply the glue because I don't want to clean my tool afterwards...Dried resin glue is REALLY hard to get off.
Some crafters just glue the magnets on the sculptures so it sticks out, like this. But I prefer hide the magnets as much as I can! I'm very anal about such things hahaa.
However, for things like this book, there was no point making a hole and embedding the magnet inside because it was so thin, so you can just glue it on! 😊

NOW HERE'S HOW YOU CAN HIDE THOSE MAGNETS.
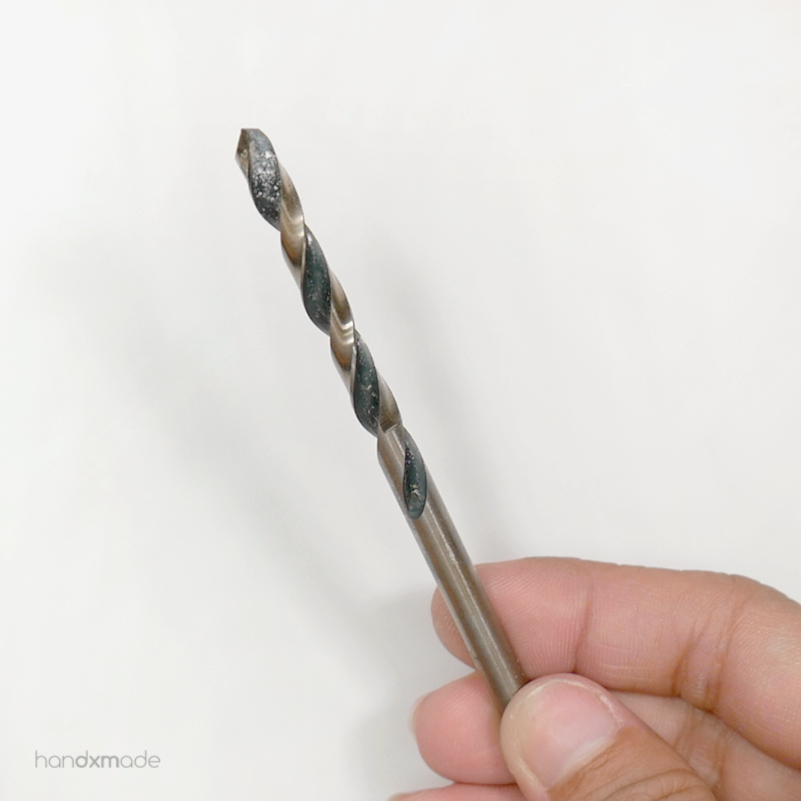
I'm just going to say this first. THESE MINI DRILLS ARE THE BEST.
Initially I tried to use needle tool to pole a hole through polymer clay, but they just break because you're basically tearing it. But these drills is basically going through the "cutting" process properly, so I've never had problem with baked clay crumbling into pieces when I use them!
I got these drill bit because I wanted to use it with my Dremel to drill holes to my baked clay if needed (yes I bough a Dremel and never use it lol), BUT THEY DON'T EVEN NEED THE DREMEL! You can just use your hands to drill it because polymer clay is relatively easy enough to "cut" through!
(So yes don't buy a Dremel if you're doing miniatures 😭 It's so expensive and even though it's nice to have...it's sitting there collecting dusts sobs)
My partner actually helped searched for it for me, and he recommended to get the drills for metal. Not sure if that affects anything, but if you're getting do get those for metal! (Just in case it DOES make a difference haha)
Here's the link to the exact one I have! Invest in it - it will help you SO MUCH to drill holes in polymer clay!
For my 3mm x 1mm HobbyMate Rare Earth magnets, I used the 3.2mm drill bit! It was the PERFECT size for the magnet, I was really amazed haha.
See how I'm just basically turning the drill bit with my finger! No need to plug in any Dremel and also feel terribly scared because it just turns so fast when you're working on such a small sculpture LOL.
Again, apply the glue with toothpick to save yourself from cleaning the resin off your beloved tools.
Put the magnet in, AND LOOK AT HOW IT FITS IN NICELY!! 😍
Resin glue takes a bit to dry, so make sure it's dried properly before trying it out with other magnets, because it might just come out of the hole while it's magnetised with other magnets 🤣 Happened to me so many times 😅
I didn't have the intention of covering these magnets because they're going to be hidden most of the time, so I left them on! I'm glad I did because it almost couldn't magnetised well with my magnetic base (which is just a metal plate, not exactly a magnet)
If you need to put a magnet in the middle of nowhere on the figurine (like this Penguin?, since he has a headphone to be put on, which I magnetised too), you can always cover it up with the same colour clay and blend it so it looks like nothing happened 😆 Use nail polish remover after baking to smoothen it even more!
There's no magnet involved here, but I just wanted to show you how you can also use the drill bit to make a hole for your characters to "hold" if this ever happens! 😊
A dab of blutack helps to keep the cucumber stay on Penguin's hand, so if you can't put any magnets, here's an alternative! 😊
ALTENATIVE TO DRILL BIT/DRILL BIT NOT BIG ENOUGH
Now there WILL be times where your drill bits isn't big enough for your indent/hole you want to make. For example, the biggest drill bit I have wasn't big enough for the 6mm SMCO magnets!
I accidentally chanced upon this newest tool I have (the yellow one) because I bought a rubber stamp kit from @droolstamps! (Click here if you want to read a review of her kit 😊) It's actually meant to carve out big surface area of the excess rubber, and I realised that it can do the same for clay! 😍
I eventually asked her for advice on getting bigger sizes, and she told me I can try those wood carving tools. So I went to a local craft store (Art Friend) and got a cheap set of wood carving tools with this particular semi-circle blade! 😊
Apparently this type of tool is call a Gouge Chisel? I found a set on e-bay so you can check it out! Check your local craft store first though - I'm sure they will sell sets for beginners, and you honestly don't need very expensive ones!
Said drill bit that I have that was the biggest but still not big enough for 6mm magnet :<
Just drillin'
Here's how I use the tool to dig out some more clay that the drill bit couldn't get to! This was before I got the bigger sized wood carving gouge tool, so it took me longer to do it with the smaller sized one haha.
And finally it fits! 😆 Trust me, I had to try to put it and removed a bit more, again and again 😅
Here's how strong SMCO magnets is! The base only has a metal piece, and it's not a magnet. But the SMCO magnet sticks on so, so well! HobbyMate's one was a bit of a disappointment 🙃
REMOVE MAGNETS THAT'S BEEN EMBEDDED
There will be times where you need to remove a glued magnet, like for example, you put it on the wrong side so the magnet repels instead of magnetised, or maybe the creation you made was unsatisfactory and you want to remove the magnet to reuse it.
I realised that the wood carving gouge tool's size actually FITS the magnets I use REALLY WELL HAHA.
It might not happen to you, and maybe I was just really lucky. But yeah!
Even the 3mm magnet fits the smallest gouge tool I have! 😍
What you do is to just use the tool to "wrap" around the magnet, go through one round, and you'll find that the magnet WILL come out relatively easily!
However, I found that you can only salvage the magnet/creation when the magnet is 1mm in height especially when your creation is small..I was trying to take out the 6mm x 3mm magnet and it destroyed my creation PLUS I slipped and accidentally carved myself instead 😅 That plaster was the result of the injury. I was bleeding quite a bit 🙃
Wear gloves if you have one for this!! Don't be like me HAHAHA.
I'm quite fond of this new tool to be honest, and I'm so happy I chanced upon it, just because I explored a new craft! 😍♥️ You can even use it to carve clay out, and I just think it's a great investment!
Hope these tips will help you to make your very own magnetised creations! 😀